Star 45

Star 45

Wednesday, December 31, 2008

Now come the questions... ;-) 12.28.08

"tony.crouch"

I'm going to order a CPM keel bulb and I'm wondering how it will attach to the plywood Mainwaring keel. I don't want to start sanding and fairing the keel until I know how that's going to work.
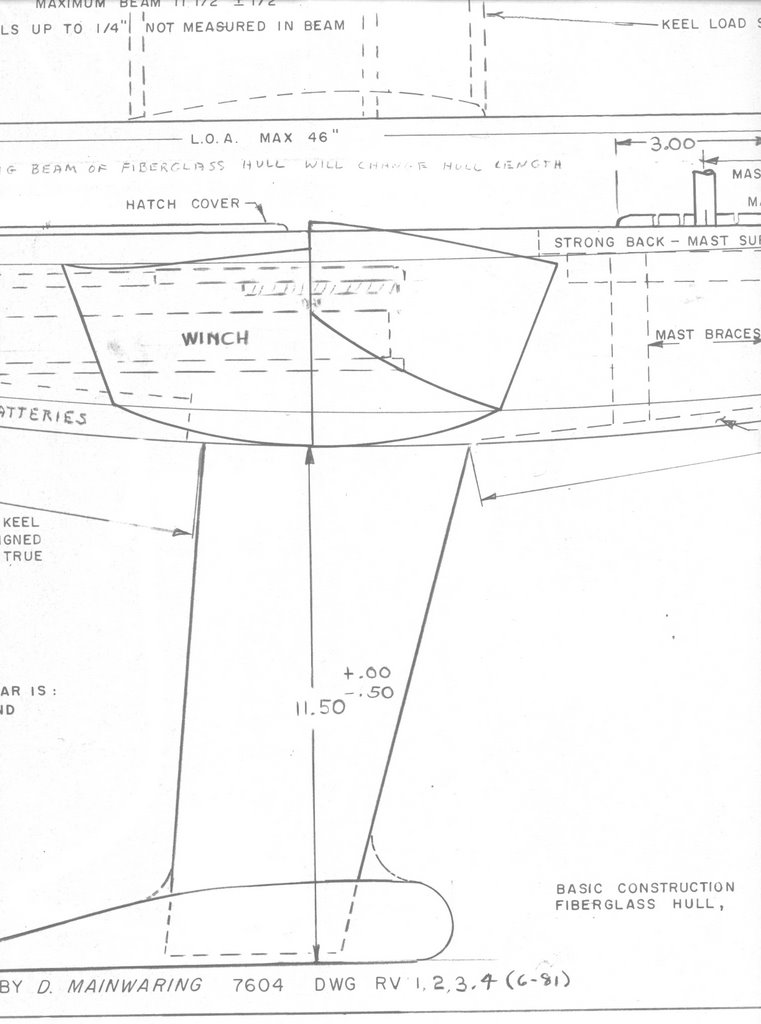
--
"Dave Mainwaring"

Here is how I mounted an aluminum fin to the hull so that it could be removed (interchangeable keels) ths method should also work for wooden fins.

http://star-45.blogspot.com/2006/08/s45-construction-keel-trunk-alignment.html#links

Dave Mainwaring

--
"J Fisher"

Here is how I attach the bulb. First I mark the center of gravity of the bulb. This is done by balancing the bulb on a small PC of rod. Once I have the CG located, I float the boat with the lead on top of the deck. Then adjust the bulb location until the transom is just out of the water. The bulb CG can then be measured in reference to the keel bolts. The fin is already to max depth so it should go through to the bottom of the bulb when fitted. Also the bulb seems to have an upward tip already so I just have it sit on the table for correct tilt with the fin sitting vertical.

I then trim the hole in the bulb and the fin until the bulb ends up in the right spot. The fin is easier to cut than the bulb. I use a chisel and file to enlarge the hole in the bulb. The fin is pretty much completed by this time, i.e. Shaped and glassed. Once everything fits correctly, I place the fin into the bulb and drill a hole for the roll pin or pins depending on the fin location (see note below). I install the pin, then use something like steel epoxy to fill the bottom of the hole. It is a two part epoxy clay that you buy in a roll, cut to length then mash together to cure. I use the under water version which is white. Once the bottom of the bulb is closed off, I pour in epoxy from the top to full any voids and seal everything. Then I fair the keel to the bulb with more of the epoxy clay. Then sand and paint.

To prep the bulb I use my orbital sander to sand down the bulb and remove any imperfections. This goes really fast with the sander. Please take appropriate caution when dealing with lead, wear a respirator and wash hands before eating. Once it is mounted I coat with epoxy then sand smooth.

Since I put my fins farther aft than the current plan location my bulbs end up sticking pretty far forward of the fin. About 1" further aft than the plans. I used the same location as Scott Rowland does in his tuning guide. This location seems to work well for heavy air, but does require you to steer the boat down wind. It also adds some lee helm in the really light stuff requiring the rig to be moved well aft to balance. With traveling to regatta's you never know what the wind will be like so I need a good all around boat. I would make a different choice if I always sailed in light conditions.

John
--

Philgeren@...
phil_geren

I just want to add a couple of things to John Fisher's great answer:
When drilling lead, use a generous amount of cutting fluid (the kind used for lubricating dies when cutting threads in pipe). This will make the drilling easy and prevent the bit from binding in the lead.
Should you waterproof inside the hull? YES. Even the dryest boats get some water inside, and it will be absorbed by the planking if the planking is not waterproofed. You want to be able to drain any water that gets inside, not have it increase the weight of the boat. Two coats of epoxy are recommended on all interior wood surfaces not otherwise waterproofed.
--
"J Fisher"

When I work with the lead bulbs I try not to do anything that requires machining or drilling the lead. The CPM bulb already has a hole for the roll pins and the fin, so you don't have to drill any holes in the lead, just the keel. Lead is so soft that it quickly gums up any cutting tool. Using coolant (water) or cutting oil (plain cooking oil works well) helps, but is messy. With this in mind the last two bulbs I used had the slot opened up with a combination file/chisel I got at Lowes. This was not a quick process but it did work pretty well. A plain wood rasp would probably also work fine. I have also heard that a sherform works well for shaping lead.
--

Philgeren@...
phil_geren

I recently had to change the shape of the keel slot in a lead bulb made in two halves by Phil Runquist, a beautiful dolphin shaped bulb.

The best thing I've found for cutting lead is a common woodworking chisel and a mallet. Lead shaves as easily as wood, and you have total control of the cut by the angle at which you hold the tool. Narrow chisels are easier to use than wide ones. It is best if you build a little jig to hold the bulb stationary while you pound on the chisel.

I mixed the lead shavings with JB Weld (epoxy containing iron powder) and put them back into areas of the slot that needed closing up.

If I have to sand lead, I do it under water, by hand, using wet-or-dry sandpaper, wearing rubber gloves.

The water keeps the lead from dusting and contains it for collection or disposal, keeping it out of your body.

It is important to be meticulous about protecting yourself from lead contamination.
--

Ed Hilton

I am planning on casting my own keel. How much do most of the keels weigh for these boats.
--

Larry Ludwig

I would just want to remind all of you guys that are working with lead that it is extremely toxic, and should never be handled without gloves. You should avoid any skin contact with lead period. Also, if you are planning on casting lead, you should do it OUTSIDE and I mean WAY outside, where the fumes are going away from you. If you can smell it, it can poison you, that is the simple rule. Obviously away from children/pets. When I cast lead I have two large shop fans that I use behind me to make certain that the fumes are moving away. I simply cannot stress strongly enough that this stuff, as with certain paints, and cutting carbon fiber can and will reduce your lifespan, or make what you have left miserable.
--

Ed Hilton

In planning to cast my own blub, How long are your blubs and what is the diameter?

--
"Dave Mainwaring"

Here is a earlier post on casting bulbs:

Wednesday, July 05, 2006

Star 45 R/C model sail boat , making a keel bulb mold and Castings

From Jim Adams:

I made a plug from balsa and finished it to a smooth finish second I used two aluminum pans (the kind that you throw away) I filled the first one with plaster took the bulb (well waxed) and placed it in the plaster half way in I used two pins through the center to hold it down. let that dry then pull out the plug next put thin saran wrap over the mold and place the plug back in the hole.

Now comes the fun part I used rubber bands to hold the plug in place (remember I had two pins that extend past the mold walls) next fill the second pan with plaster and lay the first on top it is kind of messy but it works. When the second half dries (about two hours) pull them apart. You will need to plug the holes at the ends on the sides and create small air path upward in the and a spur (looks like a funnel when you are done this needs to be big enough to pour in the led) at the end.

Billie Geisler's comments regarding "Keel Bulbs 2006 August 1:

I advise against using tire weights for ballast bulbs, because the tire weights seem to be some sort of alloy, and not pure lead. The markings on the weights are a good indicator, as different physically sized weights have the same ounce values stamped on them. So, if you use tire weights, you will have a physically larger bulb to achieve the necessary weight, thus more wetted surface friction, resistance through the water.

I go to the plumbing supply store to buy lead. This lead is much denser than tire weights. The lead comes in various shapes, some like hocky pucks, and some like Snickers bars. The Snickers bars fit into my lead pot better.

Incidentally, fishing supply stores sometimes carry electric lead pots, along with fishing weight molds. Good use for your tire weights. I was lucky enough to find a lead pot at a garage sale, sold by a rifleman who no longer cast his own bullets.

Consider mounting the ballast bulb on the keel fin at an angle, about 1 to 3 degrees up at the front. You can find info on performance of this arrangement on some IOM sites. It makes a substantial difference in boat speed on an IOM.

I cast my bulbs in two plaster of paris molds. One mold for the outer cheeks of the bulb(split fore and aft), and one for a center peice, to go between the cheeks. The thin (about 1/8 inch thick) center peice can be easily cut for fitting the fin, and drilled for adjusting the weight. If I need filler, I mix buckshot with epoxy. I can rough sand the lead with a belt sander, with very course belt. The course belt doesn't fill with lead.

--
Terry Harmer


When I finish a lead bulb I wait until it is on the fin, then I:

Scrape off the rough edges with a knife.
Wipe it thoroughly with alcohol.
Pad the fin and put it in a vise with the small end of the bulb pointing down.
Put a bucket with water right underneath the bulb.
Mix a batch of epoxy and just drip it over the top of the bulb until the bulb is covered.
(The excess epoxy drips off the small end and into the bucket, jar, or whatever.
When cured, I repeat.
When done, you have an almost perfect coating over the bulb.

Now just fill any minor dips, sand and paint.

This ensures that I don't mess with the raw let much.
--

"J Fisher"

I would use around 8 lbs if you plan on sailing in heavy air. If you sail in light air, you can probably get away with a bulb down to 7lbs. I think the blackwells are all about 7.5 lbs. The latest CPM bulbs have been right about 8.5 lbs and the Skid-Do bulbs seemed to be right about 8 lbs.

With the top several boats in the last 2 nationals being well over the 12 lb minimum I don't think overall boat weight is super critical. I do think that having enough lead is more critical than the overall boat weight.

--
"Dave Mainwaring"
Someone asked about shapes an sizes.

I like keels that resemble in some manner the "Scheel Keel". Flat bottoms help fight heeling. My version was based on my sailing in waters with lilies and pond grass that snagged torpedo shaped bulbs. I liked being able to back away and have the crap slide off the keel.

http://photos1.blogger.com/blogger/5587/620/400/Sirius%2045%2006.jpg


http://photos1.blogger.com/blogger/5587/620/400/Sirius%2045%2002.jpg


Here is a photo of the original Mainwaring Keel ad Mainwaring Bulb

http://photos1.blogger.com/x/blogger/5587/620/400/353321/Sirius45Keel.jpg


Saturday, November 15, 2008

Drum Servo with Jib Tweaker from Dave Ramos

From: David Ramos To: Star45@yahoogroups.com
Sent: Fri, 14 Nov 2008 10:23 am
The following photos show my set up for a drum servo and jib tweaker.

http://www.rcyachts.com/STAR45/P1010084.JPG


http://www.rcyachts.com/STAR45/P1010082.JPG


Main sheet is 2:1 and jib sheet is 1:1

Hope this helps
David Ramos
Chesapeake Performance Models
227 Main Street
Stevensville, MD 21666
david@rcyachts.com
www.rcyachts.com

Tuesday, September 09, 2008

fiberglass notes

From: jfisher@wildblue.net
Sender: Star45@yahoogroups.com
Date: Tue, 20 Nov 2007 11:48:10 -0700 (MST)
Subject: Re: [Star45] Fiber glass vs just sealing the boat

Based on the damage to Phil's boat at the blackwell, I would not recommend
a bare balsa hull. If glass is hard to find, use pantyhose as your
fabric. You should seal the hull with epoxy and the glass adds a small
amount of weight.

my next boats are going to be 1/16 ply sides, 3/32 cedar bottoms and then
a .5 oz layer of glass over the bottom. I think the sides should either
be ply or have glass to prevent punctures in the case of contact. Decks
will be 1/64 ply that is painted. The decks are weak and if I get hit
while heeled over I could get holed, but that is a risk I am willing to
take.

My boats with the two layers of 3.2 oz glass over balsa have held up well.
They have been hit and the damage has been limited to the deck where the
rails flexed when hit.

John

fiberlass notes

From: david@rcyachts.com
Sender: Star45@yahoogroups.com
Date: Mon, 1 Oct 2007 23:50:17 +0000
Subject: Re: [Star45] Re: Epoxy Finish

Larry Very well said I could not agree with you more.
I would add to your paint selections with Chromabase\Chromaclear by DuPont. This is a two stage auto paint with a base coat \ clear coat. I have used it for the past five years and it is great. Base cost can be made in any color and dries in 15min to the point that you can tape it to add a second color or more layers of colors. The clear coat is an epoxy and is formulated to bond with the base coat, becomes touchable in an hour so it keeps dust contamination to a min. Also because there is no clear in the base coat the layers are thinner and if you do two light coats of clear, let set overnight and then wetsand with 320 and spray one last coat the next day the seam or step between colors is invisable and the finish is very very hard. I agree that Imron is fantastic stuff but would not recomend it to the hobbiest because it can cause lung failure. If you can smell it you have smelled too much. That includes the outgassing during drying. If you realy want to use it, take your boat to an autobody shop the uses it and give them a six pack of beer and have the spray your boat before he empties the gun. They will toss more paint then is needed to paint one of our boats.
Hope this helps!
Dave Ramos

fiberlass notes

From: "John F. Howard"
Sender: Star45@yahoogroups.com
Date: Mon, 1 Oct 2007 10:08:21 -0500
Subject: RE: [Star45] Re: Epoxy Finish

Al, Epoxies stink a lot less than polyester resins (saves problems with the other half, neighbors etc) Epoxies can be clear to allow the wood to show thru (they will need a coat of UV Varnish to protect them or the epoxy will turn amber), polyester resin is not clear, usually has a green or blue non-transparent tint. Epoxies have a greater adhesion to wood Epoxies are a little softer than polyester, but for our use the difference can’t be seen or felt. Epoxies have a longer pot life and working time Epoxies are a little more flexible in the mix ratio (one or 2 drops one way or the other won’t make a difference with epoxy where a drop too much or too little of catalyst with polyester can make it set up too quick or not at all). Epoxies cost more than polyester, but the above advantages out way the cost. Epoxies do not expand like the polyurethane glues (Gorilla Glue) and additives can be used to modify the strength (colloidal silica for strength, micro balloons to lighten and make sanding of fillets easier) Epoxies take less fill coats over fiberglass than polyurethane (water or solvent based) Those are just a few reasons off the top of my head and I am sure there are more pro and con.

fiberglass notes

rom: Philgeren@aol.com
Sender: Star45@yahoogroups.com
Date: Thu, 20 Sep 2007 11:57:30 EDT
Subject: Re: [Star45] Epoxy Finish

Cathy,
Please be aware that epoxy is not imune to the damaging effects of sunlight.
Sunlight (especially the UV wavelengths) destroy epoxy.
You must varnish (using a varnish containing sunscreen, such as Spar varnish) or paint epoxy to protect it from sunlight.
Kind regards,
Phil Geren

fiberglass notes

From: Terry Forbes
Sender: Star45@yahoogroups.com
Date: Thu, 20 Sep 2007 06:53:07 -0700 (PDT)
Subject: Re: [Star45] Epoxy Finish

Hi Kathy: Terry is south Florida. I have had this problem with one of my sons boats. We took the boat and removed all the hardware and fittings and wet sanded it down with 220 - 400 grit paper. We then mask off the deck as it is wood strips with clear spar varnish. We used Spray Poof Cans of Plasti-Coat from K-Mart. We used white primer with sanding and then a finish coat of white gloss. This finish is light and holds up well here in Florida. We sail in fresh and salt water. My older son's and my boat has Interlux white boat paint for the finish. We used foam brushes and thinned the paint so that it flowed out leaving a really nice glossy finish. We gave our hulls two coats with wet sanding between applications. We did not use any primer and put the paint directly on the epoxy finish. You will wan! t to wipe the hull down with the interlux cleaner prior to painting. You can see two or our boats in the photos "Terry's Lucky Star" The white boat has the interlux and the yellow hull is plasti-coat. Happy sailing Terry

clandergan wrote: Hi, When I came back to school from the summer I had a surprise. One of the boats we had painted white was now yellow brown. It seams that as the epoxy cures, it gets a lot darker. Do you hav! e any thoughts on how one gets a nice white finish? How would I go about rescuing this boat? Thanks, Cathy

fiberglass notes

From: "David Ramos"
Sender: Star45@yahoogroups.com
Date: Mon, 10 Sep 2007 11:25:22 -0400
Subject: RE: [Star45] Fiberglass deformation from cradle

Mitch You might try taking a hair dryer and GENTLY heat the hull in the area of deformation and if you can reach it on the inside press the hull out. You want to just heat the hull in the area around the deformation enough to get it to relax a bit. Be careful to not scorch the hull. Take your time and then let it set upside down to cool. I used this technique (but used a heat gun) to fix an older EC12 that did the same thing. Was your keel attached? If so make some sort of support to take the weight of the keel and use the hull cradle to keep it on the wall but not support the weight of the boat.

fiberglass notes

From: "J Fisher"
Sender: Star45@yahoogroups.com
Date: Mon, 10 Sep 2007 08:17:20 -0700 (Mountain Standard Time)
Subject: Re: [Star45] Fiberglass deformation from cradle

Mitch, Unfortunately there is nothing I have found that will undo the damage. It is a problem with fiberglass hulls. If you apply force and heat them up they will take on a new shape. I have this happen in the cradle like you did and in the car. I have had my M fins warp from sitting in the car while I sail. If you can apply heat and some opposite pressure you might be able to get the line out, but most likely it is permanent. John

fiberlass notes

From: "Mitch Martin"
Sender: Star45@yahoogroups.com
Date: Mon, 10 Sep 2007 13:40:17 -0000
Subject: [Star45] Fiberglass deformation from cradle

I cleaned my garage a few weeks ago and moved my Blackwell Star from
the cradle which supported the hull with straps to a wall mount that
uses shelf arms covered in foam. The hull is now indented about 3
inches forward of the rudder post. I have turned the boat over so it
is now sitting on the deck, and hopefully this will fix the problem
over time.

Has anybody had the same problem and what did you do to repair it?

Mitch

fiberlass notes

From: Dave Mainwaring
Sender: Star45@yahoogroups.com
Date: Mon, 29 Jan 2007 18:06:15 -0500
Subject: Re: [Star45] Re: Construction question

so it can be sanded easily and keep the weight down.

Depending on the size of the gaps a couple of choices would be:
automotive spot putty is good, not bothered by epoxy or poly and sandable.
Another would be using automotive "Bondo" putty which is a resin with filler used for autobody work.

Micro and macro balloons both glass and phenolic mixed in resin are good also. Balloons may be difficult to find and they are a little like working with talcum powder, stuff is so light it flies around:)

I've used a lot of spot putty over the years you can get the stuff at any auto parts store that sells touch up paint. I still use it around the house for filling nicks in painted surfaces that get scratched. I think it is acrylic based, smells like acrylic lacquer.

I also have used a lot of Bondo over the years since it strong (hardens like a rock) and can be used to fillet pieces of wood in place. Mix a lump of Bondo with a smidge of Bondo hardener, use your finger to run a bead down along side the joint and in minutes it is ready to sand and paint if outside the hull.

Long and uneven gaps on a 45 inch model can't call for a lot of filler.

I've know big boat builders who make resin-foam blocks using pasta :) to add air in the resin to fill floatation areas.

If you have large gaps (1/8 inch or more) then that is another issue. You can also use a can of spray-in foam from Home Depot if you have serious gaps and then scrape off the hardened foam when the crack is filled. Hopefully the workmanship has left not been that .....

Seriously, how much weight can a crack filler add to the hull's weight?

Uncle D.

fiberlass notes

From: "John Howard"
Sender: Star45@yahoogroups.com
Date: Sat, 27 Jan 2007 17:03:19 -0000
Subject: [Star45] Re: Epoxy resins and hardeners for glassing hulls

Dave, Sticker shock, ouch? West Systems Epoxy is expensive but good stuff. The quart size will work for several hulls, so buy only what you need, it has a fairly long shelf life if store properly ( a couple of years, not 20). Check the West Systems web page under product info http://www.westsystem.com/ . Lots of good info, but a lot of reading also. The nice thing about epoxy is the low or nearly non-existant oder. The bad thing, some people can be come sensitized to it so wearing gloves, a mask (organic vapor type), a long sleeve shirt, etc. is recommended. More info on the web site. The fiberglass, 9 oz., seems heavy IMHO, 2 layers may be overkill and give you a floating tank. Are you planning on running over the competition and win by atrition? :) That's if you can catch the lighter boats.

I would use a max of 6 oz. cloth. Check and see what others say. Suggest you start with 2 oz. for the first batch and adjust as you go, you will soon figure out how much you need for the hull and the weight of the glass you are using. Get and use the pumps, it makes measuring out the correct ratio so much easier. West Systems, using the 105 Resin with either 205 Fast Hardener (9-12 min working) or 206 Slow Hardener (20-25 min working) will give you enough time to mix additional resin if needed. As long as the additional resin is applied to the first batch while still green (soft) there will be no problem as the new batch will still chemically bond with the previous batch. Once the resin has hardened completly, it will need to be sanded to provide a surface that will mechanically bond to the next resin coat. Cedar Strip Canoe builders do it (mix additional resin) all the time when they fiberglass a hull. Pot life for mixed epoxy can be extended slightly by pouring it into a shallow container (pie pan). Left in a mixing cup, the heat generated by the chemical reaction during curing will set up faster and unused (left over) epoxy can get hot enough to melt a plastic container/cup. Recomend not to use alcohol for thinning, it will change the chemical properties of the epoxy, weakening its strength and water resistance and if too much is used, may not set up.

If you need to thin the epoxy, warm the surface (hull) with a heat gun, this will thin it out and also speed up (lessen the working time) the curing time. When I fuel proof a model airplane, I put the epoxy on straight and then hit it briefly with the heat gun. You do not need to raise the temperature much. As you apply heat, you will see it thin and spread. When cooled, the epoxy will have all of its original strength and water resistance. Denatured Alcohol has no water in it, unlike your drugstore Isopropyl Alcohol 70%(Rubbing Alcohol) which can have up to 30% water in it. Isopropyl is also available as 90%. Use Denatured Alcohol, Acetone or Lacquer Thinner for clean up and depose of the materials (rags, paper towels, gloves and uncured resins and hardeners) properly. See the West Systems web page for more info under the Tab: Using West Systems Epoxy. There are other epoxy systems out there such a MAS, System 3, RAKA and others, but I do not have experience with these brands, West Systems is as close as my local marine supply store. You might also check some of the model shops for Zap Z-poxy finishing resin, don't know how well it will work or the cost in comparison, but some model airplaners use it. Hope I haven't scared you off from fiberglassing you hull. It is easy and safe IF you follow precautions. Good Luck. John

fiberglass notes

Sender: Star45@yahoogroups.com
Date: Sat, 27 Jan 2007 09:00:27 -0700 (Mountain Standard Time)
Subject: Re: [Star45] Epoxy resins and hardeners for glassing hulls

The best way to save $$ on epoxy is buy larger containers. I used to buy the qt's and now I buy the gallon resin and qt hardner. I use 10 to 12 pumps which I am told is 1 oz/pump to do 2 layers of 3 oz cloth. So one layer of 9 would be 15 to 18 pumps. So one quart will do more than one hull, probably 2 or 3 if you stretch it. I use IPA to thin the epoxy for sealing the inside, but I would not do that on the outside with glass. If the epoxy gets too thin you get a lot of pin holes. You can also make the epoxy thinner by adding heat with a hair dryer. Adding heat will make it kick faster, so this can really impact your pot life on the 205 hardner. Also tall narrow containers will reduce pot life. I used 207 which is the most UV stable hardner on my last hull. John -------Original Message------- From: davemainwaring Date: 1/27/2007 8:29:33 AM To: Star45@yahoogroups.com Subject: [Star45] Epoxy resins and hardeners for glassing hulls Having not purchased resin for twenty years it heart stopping to see
the current prices. What is the best way to save on buying resin and
hardeners.

How much resin is needed to saturate one or two layers of 9oz cloth on
a Star45 hull?

Will a quart of west 105 and .44pt 206 hardener do more than one
hull?($50.00)

An earlier post mentioned thinning epoxy with alcohol.
Good idea yes/no? What is needed for clean up?h

Uncle Dave

fiberglass notes

Sender: Star45@yahoogroups.com
Date: Fri, 26 Jan 2007 08:19:49 -0700 (Mountain Standard Time)
Subject: Re: [Star45] muslin in place of fiberglass, vac bagging

Dave, I have not heard on using muslin in that manner, but I do know the glider guys use very light glass and then paint it with polyurethane instead of resin. On the food sealers, I just use the standard bags, cheaper the better. To get the air to move I use a release cloth and breather. You can buy the actual stuff or use paper towels as a breather and wax paper with holes in it as release cloth. I am not sure the food sealers are big enough to do a hull, but they work great for small parts.

fiberlass notes

From: racer577@citystar.com
Sender: Star45@yahoogroups.com
Date: Wed, 1 Nov 2006 16:36:47 -0700 (MST)
Subject: Re: [Star45] Re: foam cored hull


We were concerned with having something resembling a one design model with three possible hull materials. There were, at that time, modelers building other class hulls with the exterior being only model airplane shrink wrap plastics and the concern was "what if" the entire framing was covered with mono-coat or some shrink material. I recall this also was one of the reasons that accounts for the hull weight be set at 16oz. Adding foam inside as a foam core plus wood or fiberglass or a combination of wood and fiberglass might make the completed hull a tad heavy??
The foam is light and adds more stiffness than adding a enough glass to get the same stiffness. The CPM deck is a glass with foam layup and at 10 oz or so is lighter than a sheet of 1/16th ply which is not nearly as stiff.
I don't see any specs addressing specifically in the area where the keel bolts are attached, which spreads out the loads associated with this high stress area. How would foam without some sort of glassing or wood lamination spread the high stresses from the keel fin?
The foam gives the glass structure so it isnt a thin flat pc supporting the weight of the keel. With 2 layers of glass 1/4" apart the bottom is very stiff and the load is spread over a large area. Real boats use foam or end grain balsa to do the same thing. Glass is not as stiff as wood. Its stronger, but not stiffer. So when you add a light filler like balsa to give the glass a shape that is stiff, you get a light strong structure.
John

fiberglass notes

BODY {font-family="Arial Black"} TT {font-family="Courier New"} BLOCKQUOTE.CITE {padding-left:0.5em; margin-left:0; margin-right:0; margin-top:0; margin-bottom:0; border-left:"solid 2";} From: racer577@citystar.com
Sender: Star45@yahoogroups.com
Date: Mon, 16 Oct 2006 08:16:42 -0600 (MDT)
Subject: Re: [Star45] FRP molded hulls and fiber-glassed hulls

Molded hulls can be done either way, with gel coat or without. Depends on the mold.

Priming depends on the paint system. Some of the rattle can paints do not need a primer.

There is mold release on a hull after molding. A hull needs to be washed and sanded before gluing anything to it or painting.

John

fiberlass notes

Sender: Star45@yahoogroups.com
Date: Mon, 16 Oct 2006 09:33:54 -0400
Subject: [Star45] FRP molded hulls and fiber-glassed hulls

Are molded hulls gel-coated or are the outsides bare-resin?

Are fiberglass hulls primed then painted?
In the case of hulls pulled from a mold do they still have mold release on the surface?

fiberlass notes

Mitch, I have used the 3.2 oz satin weave on 7 boats now. The first was a single layer and now that hull is 4 or 5 years olds it is showing wear and tear. I went to using 2 layers to help with durability and to have more material for sanding. Another thing I like about the cloth is that is drapes very nicely and easily will cover the hull with one pc. On my 10R's I have used 2 yards folded in half to do the hull. On the star I was concerned that it would be too wide for a single yard. I ended up with more than enough material so I cut it on the diagonal. The glassing starts by laying the glass over the hull. Then I smooth it out so there are no wrinkles. This may take a couple of min. Then I repeat with the next layer. Once the glass is smooth, time for epoxy. I used the 209/105 west systems combination. I used about 10 pumps of material. I start applying resin to the middle of the bottom with a cheap paint brush. Then I work my way out to the edges of the bottom. Next I do the sides. You need to use lots of resin and dont pull too much or you will pucker the cloth. Once everything is wetted out I go back with a squigee and remove the excess resin. Dont get to carried away or the cloth will go dry again. If in doubt of how this should look practice on a spare block of wood first to get a feel for how the cloth looks as you take out resin. I did the glassing at about 8 pm and with the 105/209 the resin is still green at 7 am the next morning. When green the glass can be trimmed with a #11 blade in a hobby knife. Then wait another day or two until sanding for full cure. I dont like to do much sanding, instead I try and do most of my fairing by using a thick primer and sanding most of it off between coats. For a clear boat I use polyurethane for a top coat. John

fiberglass notes

Sender: Star45@yahoogroups.com
Date: Wed, 2 Aug 2006 16:13:37 -0600 (MDT)
Subject: Re: [Star45] plugs and moulds

For the hulls I have laid up we have never used gel coat, just pva then lay up the hull. You do need to wash and sand the hulls afterword to remove the pva or nothing will stick. For a male mold you have to wash in inside of the hull before gluing anything in.
I have a lot of experiance using silicone molds. used to work at a PUR molder who used silicone tools exclusively. They offer great detail reproduction and the ability to die lock the part with no ill effect. The down side is that the silicone wears out. We used to get 30 to 80 turns per silicone before making another one. The silicone is also compressable so if you are vac bagging it may change the hull size slightly.
John

fiberglass notes

Sender: Star45@yahoogroups.com
Date: Tue, 1 Aug 2006 09:48:06 -0600 (MDT)
Subject: Re: [Star45] Comments about keel bulbs, glue, etc.

I use a myweigh 300 scale and mix the epoxy on
the scale. I found for my true 5 min epoxy I had to get a 1-1 mix or it
would not cure correctly. The scale is about $22 and can handle up to
300g with .1g resolution. Also they make mixing pads that are a coated
paper to prevent bleed and the pad has a foam backing so it doesnt move on
the table. I was given a couple of pads and they are great for mixing
small amounts of epoxy, just put them on the scale, add hard and resin in
equal weights.

John

fiberglass notes

You can also use polyurethane varnish if you are going to use the light
glass instead of epoxy. Personally I have a hard time dealing with glass
that is lighter than 2 oz/yard. If you have a vacuum chamber you can vac
down the mixed epoxy to remove bubbles. The heat will thin the epoxy and
make it kick off faster.

John

fiberglass notes

From: racer577@citystar.com
Sender: Star45@yahoogroups.com
Date: Tue, 1 Aug 2006 08:06:22 -0600 (MDT)
Subject: Re: [Star45] Re: Glues and adhesives, wooden boats, fiberglass-wood

The pot life with the 105/209 is 40 min or so. I have used that
combination when doing vac bagging and it allowed plenty of time to wet
out the fabric on a 60" boat, then apply mastic, then the bagging
materials, then pull the air out. I have also done 72" long 10R's and had
no issues with the pot life. Now I am usually about 70 deg, so that slows
it down some too.
Now the 105/205 can be more in the 10 to 20 min range depending on temp.
Also how deep the container is that you mix the epoxy will influence the
cure time. Deeper is faster.

John

fiberglass notes

From: "John F. Howard"
Sender: Star45@yahoogroups.com
Date: Tue, 1 Aug 2006 08:18:55 -0500
Subject: RE: [Star45] Re: Glues and adhesives, wooden boats, fiberglass-wood

2. Heating epoxy – Heating the epoxy or surface will cause the epoxy to thin out a bit to help soak into the wood and joints. It will also shorten the pot life (working time). Strip Canoe/Kayak builders recommend applying the first coat of epoxy late in the day as the hull is cooling to help prevent air bubbles. Second or more coats are added to the first in the green stage or well sanded if applied later. Final finish on the canoes is varnish to protect the epoxy from UV rays. On my model airplane fuselages, I used a very slow (2 hour) resin, thinned, to apply the .5 oz cloth and did not heat it, came out nice.

4. Epoxy Cure Rates – Pick up a West Systems User Manual (or look at it online). West hardeners pot life times (at 72 degrees) are; 205 – 9-12 min, 206 – 20-25 min, 207 – 22-27 min, 209 – 40-50 min. Ambient temperature will affect these times, higher temp faster set up (shorter pot life). To extend the pot life a little, after mixing the resin in a cup, pour the resin into a flat container (pie pan). Keeping the resin in the cup as a thick mass will generate more heat and set up faster; the pie pan allows the heat to escape and extends your time. Thinning the epoxy will not extend your time, only allow it to flow and penetrate better.

fiberglass notes

From: Philgeren@aol.com
Sender: Star45@yahoogroups.com
Date: Tue, 1 Aug 2006 07:54:46 EDT
Subject: Re: [Star45] Re: Glues and adhesives, wooden boats, fiberglass-wood

MItch,
What kind of set-up (hardening) times are you achieving with West epoxies and thinned (with IPA) West epoxies?
I have not been successful trying to cover large areas with fiberglass cloth, because the epoxy, even the "slow" Flex Coat stuff sold for fishing rod construction, starts to harden before I can get the surface coated and the cloth smoothed out. I have made some awful messes.
Best,
Phil Geren

fiberglass notes

From: "Mitch Martin"
Sender: Star45@yahoogroups.com
Date: Tue, 01 Aug 2006 12:59:10 -0000
Subject: [Star45] Re: Glues and adhesives, wooden boats, fiberglass-wood

I have not tried to thin WEST with IPA. I have thinned regular epoxy
with IPA and it seemed to work OK. The only place I can think of
thinning the WEST is painting the interior of the hull for water
proofing.

Working with WEST is similar to polyester resin, but it is stronger,
doesn't smell bad, and hardeners can be selected for your
application. For example if I was mixing the epoxy for glassing a
hull that would eventially be painted I would select the extra-slow
hardener 209 which has a pot life of 45 minutes. That's much longer
than a polyester resin pot life. The down side is the cost, it's
pretty pricy stuff. Another trick is to mix in the graphite powder
and it gives the finish a carbon fiber look. Take a look at this
flash movie of a woodie US1M with graphite look deck. Thanks go to
Bill Jennings on the US1M site.

Instructions for downloading US1M progress flash movie.
In order to run this file you need Macromedias free Flash Player:
http://macromedia.com/shockwave/download/download.cgi?
P1_Prod_Version=ShockwaveFlash&promoid=BIOX

Go to http://briefcase.yahoo.com/us_jennings@sbcglobal.net
Click on the US 1M flash movie folder
Right click on Match Stick Progress, select Save Target As… and select
a location to save the file to on your hard drive.

To play the movie open the file, and press Ctrl+F
To quit the movie press Ctrl+Q

Enjoy

fiberglass notes

From: "Mitch Martin"
Sender: Star45@yahoogroups.com
Date: Mon, 31 Jul 2006 16:22:23 -0000
Subject: [Star45] Re: Glues and adhesives, wooden boats, fiberglass-wood

I agree that WEST epoxy is the best for coating wood to make it
water tight and added strength. Gougeon Brothers have books out for
full scale boat building utilizing WEST epoxy that are excellent.
My personal preference is the 209 hardener and 207 for anything that
needs a clear coat. Use this for fiberglassing the hull too as the
polyester resins do not have as much strength.

fiberglass notes

From: "John F. Howard"
Sender: Star45@yahoogroups.com
Date: Mon, 31 Jul 2006 14:03:24 -0500
Subject: RE: [Star45] Re: Glues and adhesives, wooden boats, fiberglass-wood

If you use epoxy resin such as West Systems (best, you can adjust the cure rate with the different hardeners) or one of the 30-minute or longer (5-15 minute never gets hard and remains rubbery) such as sold by Great Planes or Tower, stink will not be a problem. The polyester resin does STINK in a big way, it what you can smell in a new fiberglass hull. CA glues are ok for “tacking” stuff in place until the epoxy sets up, but watch the fumes. CA will fail if used in a wet location for long and also cause a problem with the wood accepting stain. Work with plenty of ventilation and or respirator and wear gloves with any of the above glues and resins, staining of the skin and sensitivity, either skin and or breathing can occur. Good Luck

fiberglass notes for S45 Yahoo Forum

Sender: Star45@yahoogroups.com
Date: Mon, 31 Jul 2006 13:35:37 -0600 (MDT)
Subject: Re: [Star45] Re: Glues and adhesives, wooden boats,
fiberglass-wood

Epoxy is not all that smelly, but I still use a resperator while working
with it. I hope I dont generate a sensetivity to it in my lifetime.

the deck can be flat or curved. the plans show both designs. Luckily the
curved deck in only curved side to side, so it could be done flat them
bent over the hull.

John

> I am trying at all costs to avoid working with glass and poly-resin. I am
> considering some small molded pieces using epoxy and glass to see how bad
> the resin stinks up the place X;{
>
> Epoxies and such can mess up wood so it won't take stain. The striped
> decks so very nice. Could one make the deck up as a unit off the model and
> then fit it to the hull. Having a urethane glue between planks would give
> the part a fair degree of flexibility. With the new Star 45 Plans are
> the decks flat or cambered? As I recall the hull bottom could be a tad
> tricky to plank. Fiberglass hulls are so easy to put together:) But wood
> rocks!

Fiberglassing notes

From: JFisher
To: Star45@yahoogroups.com
Sent: Tue, 9 Sep 2008 12:03 pm
Subject: RE: [Star45] New Member Introduction

Welcome. In regards to the bunching at the corners, I use a light coat of 3m77 to hold things in place after cutting the folds so they will lay flat. I cut the bottom glass so that it doesn’t wrap the transom, then make a patch that covers the transom and about 1� of the bottom/sides. Same with the bow. I usually do two extra layers of glass at the bow and transom. The glass turns pretty much clear when wetted out so you don’t see the extra glass unless you look really hard. It is slightly thicker and slightly more green. I think have posted a few photos showing the reinforcements. The 3m77 seems to be key to=2 0getting the glass to stay put, but it can discolor the glass is used excessively. It will also move a little when wetted out since the epoxy seems to break down the 77’s adhesive properties.

For the fin/keel, I sand to shape, then wrap with glass (2 or 3 layers of 3 oz on the fin and 1 or 2 layers on the rudder depends how much you sand) that is held in place with 3m77 (light spray or it will show up in the glass.) I then liberally cover with resin, then vac bag with my handy food saver. Vac bagging can be done with commercial peel ply and breather or wax paper and paper towels. Just make sure to poke holes in the wax paper. Sand smooth again, then paint or if going clear I used system 3 clear coat epoxy to build the finish, then sanded again, then clear coat again, then sand, then varnish. I used the clear coat on the hull as well since it fills the minor lumps and bumps without as many coats to paint/sand as varnish.

If think you need practice, I would take a pc of scrap wood and cover it with glass. Cost is minimal and you will quickly learn how the cloth moves when wet. FWIW I like to go a littl e heavy on the resin with wetting out the cloth so it doesn’t want to pull when spreading the resin. I usually use disposable paint brushes to spread the resin and then squeegee it back out with epoxy squeegee’s that I get at the fiberglass store. You want the flexible ones, not the super stiff ones. The one problem with the paint brushes is that they lose bristles, so be ready to pick some off the model while the resin sets.
John

Monday, June 30, 2008

another star today # 842

From: "J Fisher"


I finished up another star today, 842. It has the 1" extra Fb ( free board) in the bow. It seems to sail well, it did not make as much difference as I expected. Still was able to bury the bow in a puff and the rail still gets put under when hard pressed.

Going to take it to TX this weekend and see how it compares. If it works well I will post the offsets and frames, if it doesn't work, will post the results.

You can also see the radio pot on the deck. I added this in expectation of sailing in salt water. It is a rubber maid screw top container, 4 for $3.50 at your local grocery store. Even has a flange so you can bolt it down.

Monday, June 23, 2008

Star45 : John Fisher - Dave Mainwaring Award


Star45 : Message: John Fisher - Dave Mainwaring Award:

"I have received a wooden plaque with a half model of a Star 45 and several brass plates on it from Robert Fisher. Here is what he wrote along with the plaque:

Deed of Gift
John Fisher - Dave Mainwaring Award

The purpose of this award is to recognize the efforts of John Fisher and Dave Mainwaring to utilize 21st Century computer technology to support and facilitate the scratch building for the Star 45 Class, and to regonoize the best builder-sailor at the Star 45 National Championship Regatta. Only people who scratch - built the Star 45 they sail in the National Championship Regatta may compete for this trophy. Any person who did not personally scratch - build the boat they sail is not eligible for this award. The trophy is to be awarded, until the next National Championship, to the eligible person who has the best finish in the Star 45 National Championship. This award shall not be retired.
This award is in addition to the Julie Ayers award!
Don Keeney
Star 45
Class Secretary"

Friday, May 09, 2008

Mystic Seaport: The Museum of America and the Sea™ : summer event

Mystic Seaport: The Museum of America and the Sea™ : summer event: "Renewal of championship model racing will occur at the 2008 Model Yacht Regatta on Mystic Seaport's waterfront August 21 - 24. It will feature radio-controlled (R/C) model classes as sanctioned by the American Model Yachting Association (AMYA) with the support of its U.S. Vintage Model Yacht Group (VMYG). A total of 60 R/C models and skippers will compete on race courses with marker buoys using highly-honed racing tactics. These models are based on well-known classic designs, such as Star, 12-Meter and J boats. The Seaport's R/C Laser fleet will be available for visitors to experience hands-on model yachting. More information on this sport is on the AMYA web site: www.ModelYacht.org

Notice of Race for EC-12 models - Thursday and Friday from 10 a.m. to 4:30 p.m.
Notice of Race for Wheeler models - Thursday and Friday from 10 a.m. to 4:30 p.m.
EC-12 and Wheeler models are scale versions of 1960s America's Cup and 1990s ocean racing yacht designs.

Notice of Race for J boat models - Saturday 9 a.m. to noon and Sunday noon to 3 p.m.
Notice of Race for Star 45 models - Saturday 1:30 p.m. to 4:30 p.m. and Sunday 8:30 a.m. to 11:30 a.m."