Star 45

Star 45

Monday, February 12, 2007

S45 Construction - completed hull


From: "Daniel Denson"
To: "Dave Mainwaring"
Subject: star45 photos
Date: Sun, 11 Feb 2007 20:01:39 -0600


S45 Construction - what happens when you use too much polyurethane glue


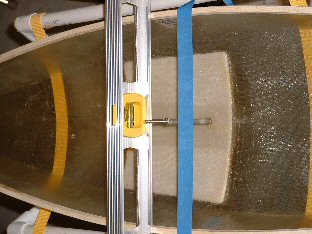
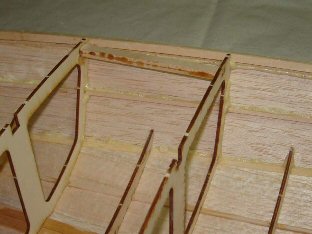
Picture #4 shows what happens when you use too much polyurethane glue. The squeezeout is unsightly. I used Gorilla Glue to attach the sides because it is flexible and it only needs to be spread on one side of the joint. It is much lighter than epoxy.

I used CA glue for the planking. First, kicker was sprayed on the plank. Then the plank was placed on the boat starting at one end. Thin CA was dribbled along the joint, and the plank was pressed against the next one. The pressing seemed to kick off the glue, which gave off smoke as it bonded. I continued this from back to front, one frame at a time, until the whole plank was attached.

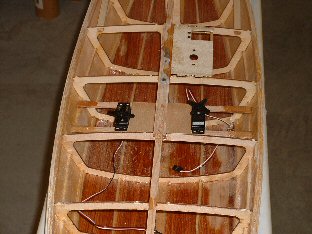
Also shown is the hardwood chainplate support. I doubled it for strength. If I was thinking, I would have doubled on top, so it would help support the deck.

S45 Construction - fore and aft views of the hull beside the building board.


From: "Daniel Denson"
To: "Dave Mainwaring"
Subject: star45 photos
Date: Sun, 11 Feb 2007 20:01:39 -0600

Hi, Dave
Here are some pictures I took yesterday of my glassed hull plus some commentary:

Pictures #1 & #2 are fore and aft views of the hull beside the building board. I used hardwood plywood with MDF cleats biscuit joined at the edges to keep it flat. Afterward, the whole thing was run over a jointer to make it perfectly flat.

Unfortunately, I wasn't quite as careful gluing on the balsa spacing strips. Although a straightedge was used, the balsa bent away from the straightedge a fraction around form #8. This could have been avoided if the spacing strips were plywood (or I was not a klutz).

Another goof was waiting too long to put on the stringers. After 4 days on the board in Houston humidity, the forms all warped noticeably. Even the transom was crooked. I actually had to use the stringers to align the frames! Don't do this.

S45 Construction -- the stern


From: "Daniel Denson"
To: "Dave Mainwaring"
Subject: star45 photos
Date: Sun, 11 Feb 2007 20:01:39 -0600


Star 45 Hull, -- BOW


From: "Daniel Denson"
To: "Dave Mainwaring"
Date: Sun, 11 Feb 2007 20:01:39 -0600


Saturday, February 10, 2007

Keel Tubes installation -- S45 cedar hull -- John Fisher


Date: Fri, 9 Feb 2007 17:18:41 -0700 (Mountain Standard Time)
From: "J Fisher"
To: "Dave mainwaring"
Subject: Photo's of keel tube install on cedar hull


Dave, I am attaching 4 photo's showing the radio tray , keel tubes glued in , how I made the keel tubes , and the keel tubes installed .

I used brass tubes on this hull and found that they were very easy to align due to the snug fit in the drilled holes. Since this fin had the standard bolts on it I put a shoulder on the inside by soldering together a couple of different sized tubes. Photo shows one already soldered and the other before soldering. I will then take an aluminum rod and thread the end to hold the keel.

I then glued the tubes in the hull using JB weld since it has very good strength for bonding metal. That is the silver colored epoxy. Time will tell if it was a good choice.

The radio tray was simply two 1/8" X 3/8" spruce strips glued in. I also added a vertical reinforcing PC in the middle. All the joints were strengthened with a small PC of fiberglass that was held in place by 3M77 while gluing. I add the glass to make sure the joints never come apart. On one boat I had to cut the radio tray out when I moved it since the glassed glue joint was so strong.

This boat will have a deck mounted winch like the first 3 that I built.

John

keel tubes and rudder tube in CPM hull. -- John Fisher


From: "J Fisher"
To: "Dave mainwaring"
Subject: Photo's of glass star build

Dave, here are two photo's of how I aligned the keel tubes and rudder tube in my CPM hull.