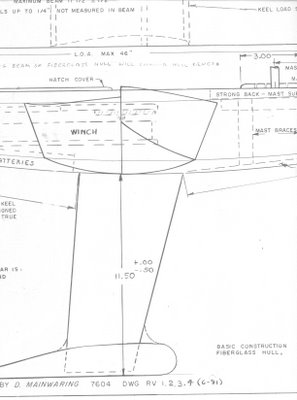
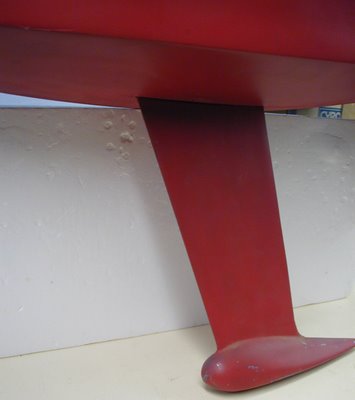
I'm going to order a CPM keel bulb and I'm wondering how it will attach to the plywood Mainwaring keel. I don't want to start sanding and fairing the keel until I know how that's going to work.
--
"Dave Mainwaring"
Here is how I mounted an aluminum fin to the hull so that it could be removed (interchangeable keels) ths method should also work for wooden fins.
http://star-45.blogspot.com/2006/08/s45-construction-keel-trunk-alignment.html#links
Dave Mainwaring
--
"J Fisher"
Here is how I attach the bulb. First I mark the center of gravity of the bulb. This is done by balancing the bulb on a small PC of rod. Once I have the CG located, I float the boat with the lead on top of the deck. Then adjust the bulb location until the transom is just out of the water. The bulb CG can then be measured in reference to the keel bolts. The fin is already to max depth so it should go through to the bottom of the bulb when fitted. Also the bulb seems to have an upward tip already so I just have it sit on the table for correct tilt with the fin sitting vertical.
I then trim the hole in the bulb and the fin until the bulb ends up in the right spot. The fin is easier to cut than the bulb. I use a chisel and file to enlarge the hole in the bulb. The fin is pretty much completed by this time, i.e. Shaped and glassed. Once everything fits correctly, I place the fin into the bulb and drill a hole for the roll pin or pins depending on the fin location (see note below). I install the pin, then use something like steel epoxy to fill the bottom of the hole. It is a two part epoxy clay that you buy in a roll, cut to length then mash together to cure. I use the under water version which is white. Once the bottom of the bulb is closed off, I pour in epoxy from the top to full any voids and seal everything. Then I fair the keel to the bulb with more of the epoxy clay. Then sand and paint.
To prep the bulb I use my orbital sander to sand down the bulb and remove any imperfections. This goes really fast with the sander. Please take appropriate caution when dealing with lead, wear a respirator and wash hands before eating. Once it is mounted I coat with epoxy then sand smooth.
Since I put my fins farther aft than the current plan location my bulbs end up sticking pretty far forward of the fin. About 1" further aft than the plans. I used the same location as Scott Rowland does in his tuning guide. This location seems to work well for heavy air, but does require you to steer the boat down wind. It also adds some lee helm in the really light stuff requiring the rig to be moved well aft to balance. With traveling to regatta's you never know what the wind will be like so I need a good all around boat. I would make a different choice if I always sailed in light conditions.
John
--
Philgeren@...
phil_geren
I just want to add a couple of things to John Fisher's great answer:
When drilling lead, use a generous amount of cutting fluid (the kind used for lubricating dies when cutting threads in pipe). This will make the drilling easy and prevent the bit from binding in the lead.
Should you waterproof inside the hull? YES. Even the dryest boats get some water inside, and it will be absorbed by the planking if the planking is not waterproofed. You want to be able to drain any water that gets inside, not have it increase the weight of the boat. Two coats of epoxy are recommended on all interior wood surfaces not otherwise waterproofed.
--
"J Fisher"
When I work with the lead bulbs I try not to do anything that requires machining or drilling the lead. The CPM bulb already has a hole for the roll pins and the fin, so you don't have to drill any holes in the lead, just the keel. Lead is so soft that it quickly gums up any cutting tool. Using coolant (water) or cutting oil (plain cooking oil works well) helps, but is messy. With this in mind the last two bulbs I used had the slot opened up with a combination file/chisel I got at Lowes. This was not a quick process but it did work pretty well. A plain wood rasp would probably also work fine. I have also heard that a sherform works well for shaping lead.
--
Philgeren@...
phil_geren
I recently had to change the shape of the keel slot in a lead bulb made in two halves by Phil Runquist, a beautiful dolphin shaped bulb.
The best thing I've found for cutting lead is a common woodworking chisel and a mallet. Lead shaves as easily as wood, and you have total control of the cut by the angle at which you hold the tool. Narrow chisels are easier to use than wide ones. It is best if you build a little jig to hold the bulb stationary while you pound on the chisel.
I mixed the lead shavings with JB Weld (epoxy containing iron powder) and put them back into areas of the slot that needed closing up.
If I have to sand lead, I do it under water, by hand, using wet-or-dry sandpaper, wearing rubber gloves.
The water keeps the lead from dusting and contains it for collection or disposal, keeping it out of your body.
It is important to be meticulous about protecting yourself from lead contamination.
--
Ed Hilton
I am planning on casting my own keel. How much do most of the keels weigh for these boats.
--
Larry Ludwig
I would just want to remind all of you guys that are working with lead that it is extremely toxic, and should never be handled without gloves. You should avoid any skin contact with lead period. Also, if you are planning on casting lead, you should do it OUTSIDE and I mean WAY outside, where the fumes are going away from you. If you can smell it, it can poison you, that is the simple rule. Obviously away from children/pets. When I cast lead I have two large shop fans that I use behind me to make certain that the fumes are moving away. I simply cannot stress strongly enough that this stuff, as with certain paints, and cutting carbon fiber can and will reduce your lifespan, or make what you have left miserable.
--
Ed Hilton
In planning to cast my own blub, How long are your blubs and what is the diameter?
--
"Dave Mainwaring"
Here is a earlier post on casting bulbs:
Wednesday, July 05, 2006
Star 45 R/C model sail boat , making a keel bulb mold and Castings
From Jim Adams:
I made a plug from balsa and finished it to a smooth finish second I used two aluminum pans (the kind that you throw away) I filled the first one with plaster took the bulb (well waxed) and placed it in the plaster half way in I used two pins through the center to hold it down. let that dry then pull out the plug next put thin saran wrap over the mold and place the plug back in the hole.
Now comes the fun part I used rubber bands to hold the plug in place (remember I had two pins that extend past the mold walls) next fill the second pan with plaster and lay the first on top it is kind of messy but it works. When the second half dries (about two hours) pull them apart. You will need to plug the holes at the ends on the sides and create small air path upward in the and a spur (looks like a funnel when you are done this needs to be big enough to pour in the led) at the end.
Billie Geisler's comments regarding "Keel Bulbs 2006 August 1:
I advise against using tire weights for ballast bulbs, because the tire weights seem to be some sort of alloy, and not pure lead. The markings on the weights are a good indicator, as different physically sized weights have the same ounce values stamped on them. So, if you use tire weights, you will have a physically larger bulb to achieve the necessary weight, thus more wetted surface friction, resistance through the water.
I go to the plumbing supply store to buy lead. This lead is much denser than tire weights. The lead comes in various shapes, some like hocky pucks, and some like Snickers bars. The Snickers bars fit into my lead pot better.
Incidentally, fishing supply stores sometimes carry electric lead pots, along with fishing weight molds. Good use for your tire weights. I was lucky enough to find a lead pot at a garage sale, sold by a rifleman who no longer cast his own bullets.
Consider mounting the ballast bulb on the keel fin at an angle, about 1 to 3 degrees up at the front. You can find info on performance of this arrangement on some IOM sites. It makes a substantial difference in boat speed on an IOM.
I cast my bulbs in two plaster of paris molds. One mold for the outer cheeks of the bulb(split fore and aft), and one for a center peice, to go between the cheeks. The thin (about 1/8 inch thick) center peice can be easily cut for fitting the fin, and drilled for adjusting the weight. If I need filler, I mix buckshot with epoxy. I can rough sand the lead with a belt sander, with very course belt. The course belt doesn't fill with lead.
Terry Harmer
When I finish a lead bulb I wait until it is on the fin, then I:
Scrape off the rough edges with a knife.
Wipe it thoroughly with alcohol.
Pad the fin and put it in a vise with the small end of the bulb pointing down.
Put a bucket with water right underneath the bulb.
Mix a batch of epoxy and just drip it over the top of the bulb until the bulb is covered.
(The excess epoxy drips off the small end and into the bucket, jar, or whatever.
When cured, I repeat.
When done, you have an almost perfect coating over the bulb.
Now just fill any minor dips, sand and paint.
This ensures that I don't mess with the raw let much.
--
"J Fisher"
I would use around 8 lbs if you plan on sailing in heavy air. If you sail in light air, you can probably get away with a bulb down to 7lbs. I think the blackwells are all about 7.5 lbs. The latest CPM bulbs have been right about 8.5 lbs and the Skid-Do bulbs seemed to be right about 8 lbs.
With the top several boats in the last 2 nationals being well over the 12 lb minimum I don't think overall boat weight is super critical. I do think that having enough lead is more critical than the overall boat weight.
--
"Dave Mainwaring"
Someone asked about shapes an sizes.
I like keels that resemble in some manner the "Scheel Keel". Flat bottoms help fight heeling. My version was based on my sailing in waters with lilies and pond grass that snagged torpedo shaped bulbs. I liked being able to back away and have the crap slide off the keel.
http://photos1.blogger.com/blogger/5587/620/400/Sirius%2045%2006.jpg

http://photos1.blogger.com/blogger/5587/620/400/Sirius%2045%2002.jpg

Here is a photo of the original Mainwaring Keel ad Mainwaring Bulb
http://photos1.blogger.com/x/blogger/5587/620/400/353321/Sirius45Keel.jpg

