Star 45

Star 45

Tuesday, April 24, 2007

Star 45 Sails, Colors, materials,

Apr 2007 Subject: [Star45] Sails - colors
--
From: "Larry Ludwig" mailing list Star45@yahoogroups.com

You can have colored sails, it doesn't mean that you have to compete with them. Even if you do, don't discount them all that much. You can make your own from ripstop and the colors are all available. The material is inexpensive enough that even if you do botch the first few attempts it's not going to set you back more than $10.00

Learning to make sails teachs you more about TRIMMING sails and the way they take a "set" than sailing a boat ever will.

If you set your mainsail luff as a bolt rope (and you should IMHO) then it takes only a few seconds to pop off your mast head or foot, slide out one sail and slide in the other. Then if your jib is setup as a hook attachment to a hole in the mast, you unhook from the deck, unhook from the mast and voila, you are ready to hook both ends of the 2nd sail and you are complete. You should be able to change the sails on your boat in 2 minutes if you are properly set up. Of course, using a 2nd mast and complete rig is even faster. If you setup so your turnbuckles remain on the deck, then they are ready to go regardless of which rig you chose, and you reduce the cost of a 2nd rig by $40 right there.

Don't discount ripstop sails too much. They may not be all the rage... but I promise you the skipper skill factor is WAY more important than the sail material. I have rip stop sails here that have lasted 20 years, if they are well cared for, they will last. Skippers familiar with the Vic class will remember a Regional Regatta being won with a stock ripstop mainsail last year ( I think it was)

Give it a shot, you won't be sorry you did. *and it DOES look very nice on your boat.
--
From: "J Fisher" Sender: Star45@yahoogroups.com Subject: Re: [Star45] Sails - colors

I have seen people in the 914 fleet use colored markers to color sails. I think it was mostly to tell the boats apart, but there were some interesting designs. You could probably paint your sails as well to get color.
--
From: jfisher@wildblue.net I have made a lot of sail and could put together a step by step to make sails.

I use mylar which I buy from www.McMaster.com. They only carry clear, so I sand it to make it translucent. It colors well with markers so that would be one way to make colored sails. To make sails you can use the sail block based on the method provided on the star 45 yahoo groups by John Whitford or you can use the block from great basin, which is based on the Sweede Johnson sail block. I have used the sweede block with good results.
--
From: "Larry Ludwig" Sender: Star45@yahoogroups.com Subject: RE: [Star45] Sails - colors

You can make panelled sails, but it is not required. You can get PLENTY of use out of a single panelled sail. They actually have some advantages in high winds because of the less draught. Also, but putting in the luff curve and using a bolt-rope main, you do have a sail with some draught to it, not just a flat sheet of cloth. The block method works fine, but also.. is not required. Basically you cut the bottom panel seam flat, and draw your airfoil MAC (mean aerodynamic chord) and cut it with a #9 X-acto or scissors. Use seamstress tape and overstitch. Do the same thing with the luff curve, and hem the foot and leech and you are about there. Oversew some corner panels, tack on some batten pockets and thread in a piece of weed-eater line up the hem of the luff and you are ready to put on your class markings and numbers. Grommets in the corners are installed either with a seamstress tool or they could be ordered from Don Ginther at GBMY if he is still shipping, he was in the process of suspending operations.

Where to find the material? Nylon ripstop is inexpensive... typically $6-$7 (x 38-50" long bolt) a yard at LONDON's Fabrics or HANCOCK Fabrics, sometimes you will find it at HOBBY LOBBY retail stores, but if you check your local fabric store you will most likely come up with some in various colors. Also using contrasting thread colors can make the sail more attractive. Start with a single panel sail and go through all the steps. When you are ready to start making paneled sails... don't be afraid to make them out of paper first. Typical brown paper can be cut and taped together and makes a perfect mock up of the sail for pennies.
--
From: "Al Stein" Sender: Star45@yahoogroups.com Subject: [Star45] Re: Sails - colors

I think I got mine from Potomac Sailmakers in Alexandria, Virginia... I bought yellow and orange, but they had a bunch of different colors in spinnaker cloth, and very light weight and airtight it is.

It's fairly stiff, too, for as light as it is -- something well under an ounce per yard. Price about the same as Larry experienced... less than $10 a running yard from a BIG WIDE bolt (can't remenber exact width, but it was much wider than normal fabric store goods.
--
From: "John & Kelly" Sender: Star45@yahoogroups.com Subject: RE: [Star45] Sails - colors

I have built US One Meter sails from spinnaker cloth purchased from Sailrite.

I used .5 oz which is only available in red, white, and blue, but .75 oz is available in a multitude of colors.

The part I like best about these materials is you can buy a role of C3 spinnaker tape (pricey at $25.00) and build a set of sails without sewing a stitch.

They actually use C3 to tape together the body seams of full scale spinnakers so I'm pretty sure it can take just about anything a model can throw at it.

I've built two sets of sails and only used about 10% of my role of tape so that $25.00 will go a long way.

At about $12.00 a yard, spinnaker cloth is twice the cost of fabric store ripstop, but spinnaker cloth is coated with resin that makes it far more stable and eliminates all porosity (wind can blow right through ripstop). I also haven't tried using C3 on plain ripstop, so I can't say how the bond will hold up.

For cutting fabric like this I'd use a hot knife. I bought a $4.00 40watt soldering iron at the local mega-mart, removed the tip, hammered it flat, and put it back in. Cutting works best over a smooth heat resistant surface. I use my glass topped kitchen table (when my wife's not home).
--

Friday, April 20, 2007

[Star45] Update on planking bottom with edge glueing.

[Star45] Update on planking bottom with edge glueing.

John Fisher is ready { 4/19/2007 } to glass his latest boat and is sharing how he planked it. His dad built a ply sided, cedar planked star using titebond II and it came out pretty light and stiff. With this information I started to build another hull using the same materials. He felt that edge gluing the planks added a lot of the strength to his boat. John didn't want to glue in extra wood to hold the pins to keep the planks in place for the glue to dry, so I combined two methods of planking. John liked the quickness of planking with CA and kicker, but it lacked stiffness when sanding the bottom before glassing. So he decided to edge glue the planks and then tack them in place to the frames with CA.

In this photo you can see where John put drops of CA on the planks. The wood is slightly darker.


It worked well. John has an edge glued bottom and he was able to plank it in one evening. To do this John first spray the frames with kicker, then apply titebond III to the edge of the planks. He then would hold the plank in place, tight against the previous plank, and apply a drop of CA to each frame to hold it in place. It did not matter where John started, bow, stern, or middle, but do make sure the CA has set up before moving to the next frame. Once the whole plank was in place he came back and wiped off the extra titebond. To fair the bottom to the sides he used a $10, 6" plane from home depot set at .010" depth of cut. It quickly removed the cedar and a little sanding finished the job.

John had one plank that was too thin that he had to remove, it was harder than expected. He had the use quite a bit of force to break the glue joint at each frame, so he is confident that this method is strong. John will also use this for balsa planked bottoms.

In photo # 10 you can see the stern still needs to be trimmed and sanded. John will probably use a saw to trim in close and then sand to fair it.

Star 45 DECK John Fisher 4/19/2007

4/19/2007 John Fisher just finished the deck rigging last night on his latest boat. The boat is set up pretty simple. Open loop with elastic. Winch is below deck, but the same rigging setup can be used with an on deck winch, just substitute a turning block for the through deck block.

The sheets go forward to a block on a bridle for the main sheet. The jib sheet and elastic go through a double block attached to the chain plate to keep things from rubbing on the mast, then through an adjustable double block forward. The jib sheet then goes back to a deck mounted block. The elastic is then hooked to a loop on deck. John put a hook in the elastic so he can release tension when in storage.

Chain plates and mast step are laid out per Scott Rowlands tuning guide.


In tweaker photo bellow you can see the tweaker servo and winch mount.

Thursday, March 22, 2007

MainZone International, ship models, R/C, radio control, Sailing Models, wooden boats, model boat, Star45, Star 45

MainZone International, ship models, R/C, radio control, Sailing Models, wooden boats, model boat, Star45, Star 45: "How to Build a
Wooden Sailing Model Boat


'Building a model made simple.'

See how to build to Build a radio controlled Wooden Sailing Model Boat. Enjoy the pleasure of wooden boat building. Based on the International Star Boat this semi-scale Star45 can be scratch built by novice or seasoned skipper. Easily radio controlled and large enough to see out on the water this is a classic model model built by hobbyists for over thirty years.

Here are downloadable files for Star 45 shadows - frames. You can use your browser to download the files. Click on link or go to www.mainzone.com/star45frames/ select the files you want and they will download to your machine"

Friday, March 16, 2007

Jib Tweaker, adjusts lenght of jib sheet VS Jib Twitcher

Jib tweaker with swing arm sail control unit:

Adding a servo to the end of the jib sheet allows the jib to be "tweaked" by changing the effective length of the sheet while under sail. The challenge is to set the servo to mid point when setting the model up prior to sailing.

Tweaker with drum type sail control unit.


A jib twicher is a rig that pulls the jib boom to port or to starboard when sailing down wind.

These to devices are often confused with each other :)

Monday, March 05, 2007

Step by step model building instructions available


If you want to read step by step instructions please visit: http://woodstar45.blogspot.com/
Model Sail Boat Building, How To Build A Wooden Star45 R/C Sailing Model.

This radio controlled sailing model is based on the International Star Boat.

This semi-scale wooden sailing model can be scratch built by novice or seasoned skipper.


Plans are available from the AMYA, Downloadable drawings to make laser cut bulkheads are available.

The blog your are currenty reading is journal. Members and contributors post content in chronological order. This means you must search through the blog's content to find information.

I sorted all the building posts out into the workflow for making a model and posted the steps on Model Sail Boat Building, How To Build A Wooden Star45 R/C Sailing Model

Dave Mainwaring

Monday, February 12, 2007

S45 Construction - completed hull


From: "Daniel Denson"
To: "Dave Mainwaring"
Subject: star45 photos
Date: Sun, 11 Feb 2007 20:01:39 -0600


S45 Construction - what happens when you use too much polyurethane glue


Picture #4 shows what happens when you use too much polyurethane glue. The squeezeout is unsightly. I used Gorilla Glue to attach the sides because it is flexible and it only needs to be spread on one side of the joint. It is much lighter than epoxy.

I used CA glue for the planking. First, kicker was sprayed on the plank. Then the plank was placed on the boat starting at one end. Thin CA was dribbled along the joint, and the plank was pressed against the next one. The pressing seemed to kick off the glue, which gave off smoke as it bonded. I continued this from back to front, one frame at a time, until the whole plank was attached.

Also shown is the hardwood chainplate support. I doubled it for strength. If I was thinking, I would have doubled on top, so it would help support the deck.

S45 Construction - fore and aft views of the hull beside the building board.


From: "Daniel Denson"
To: "Dave Mainwaring"
Subject: star45 photos
Date: Sun, 11 Feb 2007 20:01:39 -0600

Hi, Dave
Here are some pictures I took yesterday of my glassed hull plus some commentary:

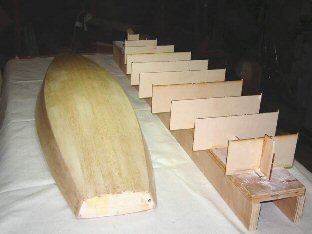
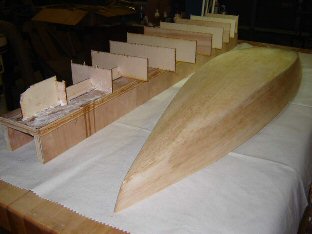
Pictures #1 & #2 are fore and aft views of the hull beside the building board. I used hardwood plywood with MDF cleats biscuit joined at the edges to keep it flat. Afterward, the whole thing was run over a jointer to make it perfectly flat.

Unfortunately, I wasn't quite as careful gluing on the balsa spacing strips. Although a straightedge was used, the balsa bent away from the straightedge a fraction around form #8. This could have been avoided if the spacing strips were plywood (or I was not a klutz).

Another goof was waiting too long to put on the stringers. After 4 days on the board in Houston humidity, the forms all warped noticeably. Even the transom was crooked. I actually had to use the stringers to align the frames! Don't do this.

S45 Construction -- the stern


From: "Daniel Denson"
To: "Dave Mainwaring"
Subject: star45 photos
Date: Sun, 11 Feb 2007 20:01:39 -0600


Star 45 Hull, -- BOW


From: "Daniel Denson"
To: "Dave Mainwaring"
Date: Sun, 11 Feb 2007 20:01:39 -0600


Saturday, February 10, 2007

Keel Tubes installation -- S45 cedar hull -- John Fisher


Date: Fri, 9 Feb 2007 17:18:41 -0700 (Mountain Standard Time)
From: "J Fisher"
To: "Dave mainwaring"
Subject: Photo's of keel tube install on cedar hull


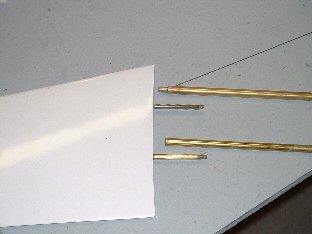
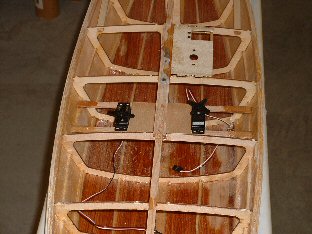
Dave, I am attaching 4 photo's showing the radio tray , keel tubes glued in , how I made the keel tubes , and the keel tubes installed .

I used brass tubes on this hull and found that they were very easy to align due to the snug fit in the drilled holes. Since this fin had the standard bolts on it I put a shoulder on the inside by soldering together a couple of different sized tubes. Photo shows one already soldered and the other before soldering. I will then take an aluminum rod and thread the end to hold the keel.

I then glued the tubes in the hull using JB weld since it has very good strength for bonding metal. That is the silver colored epoxy. Time will tell if it was a good choice.

The radio tray was simply two 1/8" X 3/8" spruce strips glued in. I also added a vertical reinforcing PC in the middle. All the joints were strengthened with a small PC of fiberglass that was held in place by 3M77 while gluing. I add the glass to make sure the joints never come apart. On one boat I had to cut the radio tray out when I moved it since the glassed glue joint was so strong.

This boat will have a deck mounted winch like the first 3 that I built.

John

keel tubes and rudder tube in CPM hull. -- John Fisher


From: "J Fisher"
To: "Dave mainwaring"
Subject: Photo's of glass star build

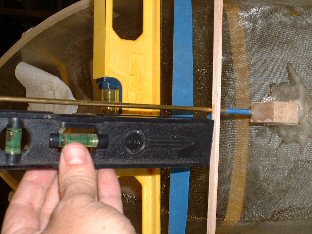
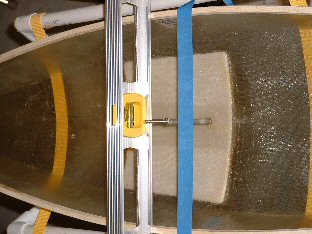
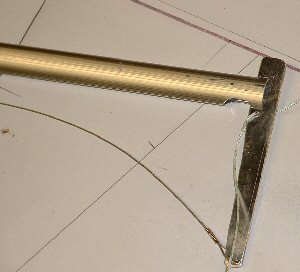
Dave, here are two photo's of how I aligned the keel tubes and rudder tube in my CPM hull.

Wednesday, January 31, 2007

Racy SUPER MODELS - radio controlled model yacht racing Boat/US Magazine

Racy SUPER MODELS - radio controlled model yacht racing Boat/US Magazine:

"Racy SUPER MODELS - radio controlled model yacht racing
Boat/US Magazine, May, 2000 by Elaine Dickinson

With the pop of the starting gun, all hands flew into action. Rudders strained to tack sharply and get on the favored side of the racing course; sails were trimmed tight as a drum to eke every last iota of speed out of the wind; waves slammed into bows and washed clear over the decks. And as the fleet raced toward the first turning mark, the atmosphere intensified and nervous fingers grabbed the toggle switches for additional maneuvering.

Toggle switches?

Model yacht racing, or 'RC' racing (for 'radio controlled') is what gets many boaters through the winter. It keeps the adrenaline flowing from the thrill of competition, albeit on a small scale. But, like boating, it offers camaraderie and fun that's easily accessible to anyone with working fingers and enough charged up AA batteries for an afternoon of sailing.

Thinking small is easier on the bank account as well. The outlay for a ready-to-sail RC boat is usually in the hundreds of dollars, not thousands. Access to the water is as simple to find as a quiet pond at a local park. Some cities have even built special yacht racing ponds, such as San Diego, because it's such an eye-catching attraction.
Advertisement

'Model racing is less of a commitment in terms of time as well as money,' said Dick Rutledge, a BoatU.S. member from Houston who is also the national vice president of the American Model Yacht Association (AMYA), the all-volunteer organization which sanctions classes of RC boats and all official races. 'I can have my model loaded and on the water in 20 minutes.'

Rutledge and his wife Nancy are avid racers on Lake Conroe in Texas and compete in their full-sized 'people boat,' a Ranger 22. One day at the dock, one of their Ranger class friends was playing with a model yacht and handed the control box to Rutledge. 'I was hooked,' he said, and now travels throughout the U.S. to compete in the Star 45 and 36/600 class races. His wife is a top competitor as well. The Rutledges also belong to the Houston Model Yacht Club, one of 120 in the U.S. that organize local races."

Thursday, January 18, 2007

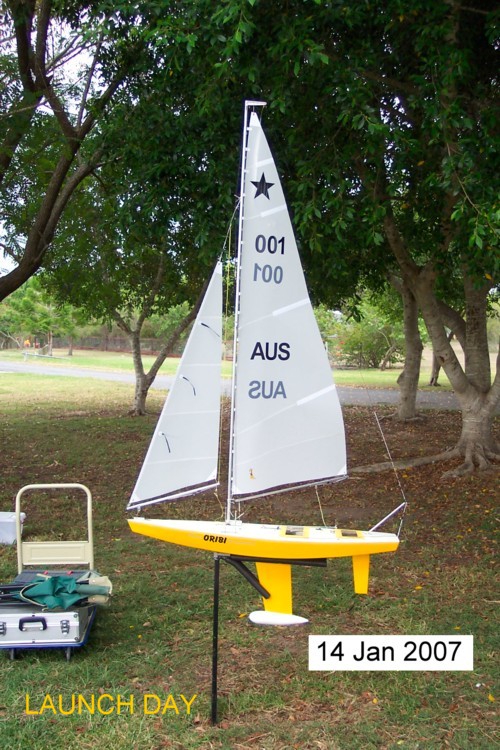
The Big Day!! Star 45 Launch


From: John Whiteford


G'day ,
Great morning yesterday when we launched Oribi tho for the first time for some time the weather was overcast and the wind fickle. However all went well and she looked pretty good and some good comments from the few members there. Had a couple of nice gusts which pushed her along and she went well, so looking forward to next time. Took heaps of photos and attach the best here. Must qualify the CHRISTENING!! The phial in Julia's hand contains red wine which she rubbed over the bow with her finger....not allowed to take alcohol into this park!! So I drank the rest last night!!!!! Also please note the cap in PROUD OWNERS. I got quite a few comments re this!!! and stirred them up!!! I was wondering if any of these should be placed on the Star45 website and where. If you think so would you be kind enough to copy them there for me please Don. Also thanks for the advice on the bow bumper and will sort something out along that idea.
Kind regards,
John


Thursday, January 04, 2007

S45 Construction : rigging b.o.m. from John Fisher

To:Star45@yahoogroups.com
From: 'J Fisher'jfisher@wildblue.net
Sender: Star45@yahoogroups.com
Date: Wed, 3 Jan 2007 21:02:38 -0700 (Mountain Standard Time)
Subject: Re: [Star45] Deck rigging and such

Here is the list on the star 45 yahoo groups for rigging. I am using the following for my next couple of builds:
GBMY item #, description, qty, purpose
019, 3/8' alloy tube, 1, Jib boom
034, Hales single block, 2, main and jib sheets
146, tapered drain plug, 1, plug in transom
182, Z sheet hook, 2, sheet ends/boom attachment
202, large bowsie, 1, back stay/forestay with 80 lb Dacron, order small ones if using spektra
206, O-rings, 1, hold the Z hooks to the boom.
254, double block, 2, main sheet and jib sheet adjuster
255, sheet exit, 1, turning block for main sheet from under deck to above deck.
269, eye plate, 1, mounting for jib block.
272, 180 deg sheet lead, 1, turn around for jib tweaker
280, sheet hook, 1, hooks for backstay and fore stay.
282, tang, 1, attach lowers to mast.
907, rigging screw, 4 hooks, 2 packs, upper and lowers to the deck.

I also build my own chain plates, so I don't order them from GBMY. Don does carry them if you need them. I also like the Ludwig mast better than the bantock mast, so I ordered 8 foot masts cut to 69' from Larry Ludwig, the other 28' or so is the main boom. Last time I made all my own boom vang, mast fitting. This time I ordered them from Larry. You can use the bantock mast, boom, and fittings from GBMY as well. They are good stuff and I have them on my IOM.

The back stay crane is made from 1/16 (.063') aluminum that I bought at the local hobby shop.

John"

Wednesday, January 03, 2007

S45 Construction : Re: Woodie construction tip

"To: Star45@yahoogroups.com
From: 'Mitch Martin'
Sender: Star45@yahoogroups.com
Date: Wed, 03 Jan 2007 00:01:50 -0000
Subject: [Star45] Re: Woodie construction tip

Thanks for the encouragement! To answer your questions: I CAed the
1/32' bass wood to the frames and stringers. When I epoxy the
inside it will make the permanent bond. The layers of veneer are
cold molded with system 3 epoxy. I will have two layers on the
bottom and one on the sides, then glass with epoxy and .6 oz glass
cloth. Then one more layer of veneer. I do intend to laser some
patterns into the veneer. Then I'll finish with more clear epoxy
(probably west) and then varnish. Like I said, it's not going to be
light, but will look like a jewelery box when done.

--- In Star45@yahoogroups.com, Drake Dunivan
wrote:
>
> Thanks for that tip, its always nice to learn from
> someone elses mistakes :)
>
> What are you using for the adhesive? CA? Tightbond
> III?
>
> Hopefully everything else goes smoothly.
> drake
>
>
> --- Mitch Martin wrote:
>
> > I just made a mistake on my woodie and wanted to
> > pass along the tip.
> > You must install the side planks before installing
> > the botton planks.
> >
> > I tried to do the bottom first and it bent the thin
> > chine rails up and
> > now I have a wavy chine. It can be sanded out a
> > little but it's not
> > as good as I would have liked. Also, I have started
> > veneering the
> > hull with .035' maple and mohagany veneers. Should
> > be nice looking
> > when done.
> >
> > Best, Mitch
> >"

Saturday, December 23, 2006

S45 Construction | John Fisher - keel tubes

Date: Fri, 22 Dec 2006 18:22:14 -0700 (Mountain Standard Time)
From: "John Fisher"
To: "Dave mainwaring"
Subject: Star 45 keel tubes


Here is a photo sequence showing how I made my keel tubes. I am using a keel from CPM (David Ramos) with longer keel bolts so they will go through the deck when finished. I coated the brass rod with carnuba was as a mold release.

http://woodstar45.blogspot.com/2006/10/s45-construction-john-fisher-keel.html

John

Radio install on star # 3 | John Fisher

http://woodstar45.blogspot.com/2006/10/s45-model-boat-construction-sail.html

Date: Fri, 22 Dec 2006 18:09:14 -0700 (Mountain Standard Time)
From: "John Fisher"
To: "Dave Mainwaring" ,
Subject: Radio install on star # 3


Here are a couple of photo's of my latest star. I have just finished installing the radio tray for an under deck winch, jib tweaker, and rudder servo. I also included a photo of the sheet through deck mount. I also show the jib tweaker turn around. The part is a 180 deg sheet lead from great basin.

The radio tray is 1/16 ply backed up with 1/8 X 3/8 spruce or basswood. Note the glassing at the ends. This adds a lot of strength to the joint and I highly recommend adding it. I have 1" wide glass tape that I cut in half, then sprayed with 3M77 so it will stay in place for gluing. Then a dab of your favorite epoxy and you are done.

Thursday, December 21, 2006

Duddy's universal building jig,: materials used


From: "MICHAEL DUDDY"
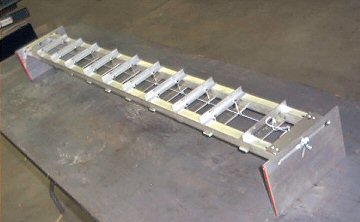
M. Duddy's universal building jig
Date: Thu, 21 Dec 2006 08:28:46 -0500


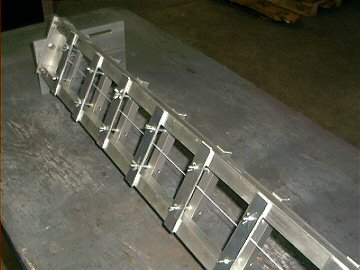
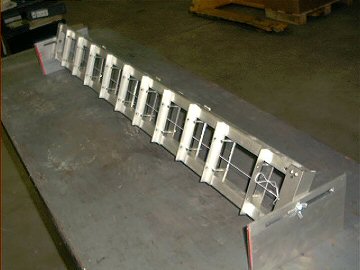
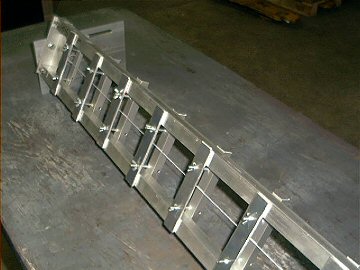
The material used in the jig is 1"x1"x1/16" aluminum square tube( very ridged and no twist).
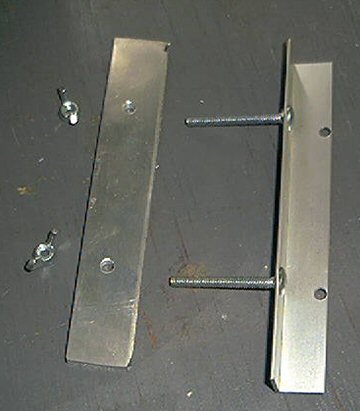
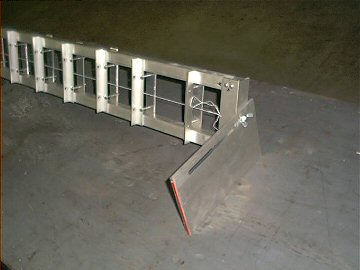
The ends are 1 1/2" angle bolted in two places on the ends as you can see in the pictures. I checked the ends with levels and the jig is dead straight.

The angle pieces with the screws in them are 3/4"x 1/16" x 6" long. You mount your frames to these with a square on the centerline of your frame inline with the center of the attachment piece.

Next you use a square to square these on the jig rails, and line up with the string. Now you are rite on brother.:) The dimensions of this jig are ; 60" long x 6" wide because they only had 60" pieces in the rack , and I didn't know what I might be building in the future. You can make it any size you want.

The end plates I made from 1/4"(stuff laying around), and milled slots in them so I could slide the jig to one side or the other for balance. If you have any questions or if I can help you in any way , get in touch with me.

Mike

Tuesday, December 19, 2006

S45 Construction Michael Duddy's Universal Building Jig


From: "MICHAEL DUDDY"
Subject: universal building jig
Date: Mon, 18 Dec 2006


Attached is the pictures of the jig. It isn't hard to build , and can be used on most any boat model (maybe even wings too). It is all adjustable , and it can be tilted on either side to plank the sides of the hull you are working on. Once the hull is done it can be removed very easy. The materials are available at places like Home Depot,or Lowes , and I know of some aluminum suppliers that sell in small quantities. I could draw up some plans if anyone is interested. I have to make a stem and transom angle holder for it.


Join the AMYA Star45 Class !

Sunday, December 17, 2006

Tank Notes on International Star Boats (1/3 size models)

Tank Notes on Star Boats: "ROUND chines add another complication to getting speed from a hull. This bad feature is an extension of the range in which burble will appear. In the wake of any transom-sterned boat, a severe agitation of the water may be noticed, an indication that a breakdown is occurring in the flow of water under the boat. When water is released from the transom properly, the burble that means an increase in resistance is not present. However, it is possible to run without burble only above and below definite speeds, the range depending on the lines of the boat. But, also, the shape of the chine has some effect. With a square-chined Star, it is safe to say that the burble will appear at about 5 knots and run clear aft at about 6 1/2 knots (when the boat is upright and on the designed trim). Increasing the bilge radius to 3 inches, on a Star, increases the burble range by dropping the lower limit to 4 1/2 knots and by raising the upper limit to 7 1/2 knots. Also, a model with round chines, when running heeled, begins to climb out of the water forward as the speed increases, the round chine acting as a flat surface on which the model tries to plane. To complete the analysis, it is necessary to go back to sharp-chined heeled models, in which the burble range is from 4 1/2 to 6 1/2 knots.

With the sharp-chined models, there was no indication that the bow tried to rise, a further proof that the sharp entrance angles are imperative. The easiest way to decrease the burble range is to trim the boat by the head and, conversely, the handicap of a trim by the stern is that it will cause the water to break away from the transom at speeds lower than normal. Under all conditions except that of a rounded chine, the burble range increases by dropping the lower limit; the upper limit is quite constant, being 6 1/2 knots. Interestingly, that is approximately the speed at which some styles of Star hulls show the first signs of planing.

In summary, it can be said that many Star boat owners might have had a faster boat than the standard Star because:
1. The fore and aft contour of the boat had been flattened and a large decrease in resistance accrued.
2. The boat was sailed down by the head, at least while running, which would give a 12 per cent decrease in the power required to drive her.
3. Square chines might have been used, which mean a decrease in resistance.

Although this work was done directly on Stars, the information is also applicable to other types of square-chined boats. But it must always be remembered that, even though a skipper have all the information in the world and his boat has an enviable heritage from designer and builder, the combination must sail hard to be a winner."


Complete article on www.starclass.org/

Tuesday, December 05, 2006

Star 45 Class | Rod Carr's "SPOT" Star #1


The modern day Star 45 Class got started back "when" Rod Carr got the AMYA launched and introduced the modeling world to his Star #1

Saturday, December 02, 2006

7.0 KEELS AND BALLAST BULBS: class specs.

Class specifications as of 2006:

7.0 KEELS AND BALLAST BULBS:

7.1 Keel will be of the style known as drop, and will be of the FIN and BULB type.

7.2 Keel fins may be solid or hollow and constructed of reinforced plastic, plastic laminates, fiberglass, wood or metal. (Note: Strength and integrity of the keel fins must be maintained whether built solid or hollow.) Keel fin shape is not specified but must follow the general shapes outlined on the reference drawing. However, keels will not be less than 6 inches nor more than 8 inches long (Fore and Aft) at the keel/hull junction, nor less than 4 inches nor more than 6 inches long (Fore and
Aft) at the keel/ballast bulb junction.

7.3 Keels, keel fins and ballast bulbs may be removable, however, they may not be changed, interchanged, substituted or otherwise manipulated once any heat or series of heats in which scores will be compiled, has started. Mechanically movable keels or ballast bulbs are specifically prohibited from use in Star 45 Class Yachts.

7.4 Ballast bulbs may be constructed of any material not prohibited by the AMYA. The actual shape is left to the builder's discretion, but will not exceed 9.75 (9 3/4) inches from the front of the keel bulb to the rearmost point of the keel or bulb.

7.5 Total drop (length) of the keel fin/ballast bulb combination will not exceed 11.5 (11 1/2) inches when measured from the keel/hull junction, before any fillers or streamlining is added.

7.6 Ballast may be made from any readily available material, such as poured lead, lead shot, etc. (Note: When using material such as lead shot, the mass must be solidified through the use of a bonding agent such as fiberglass or epoxy resin, plaster of paris, poured over and through in order to create a solid mass.)

7.7 Race directors may elect to use a template based on the construction plans to determine the keel length (depth).

7.8 Keel depth shall be measured from the center of the keel fin at the hull to the bottom of the ballast bulb. This measurement is from the edge of the bottom of the hull as it meets the side of the keel and should be determined during construction and before any fillet or fairing is added.

7.9 The Star 45 Class specifically excludes radio equipment, sail controls and batteries (power cells) from being considered ballast. This specification defines ballast as anything carried aboard the model for the main purpose of changing the weight distribution of the model and/or weight of the model. Ballast shall be fixed in place by gluing, fiberglassing, or bolting (bolts and screws).

7.9.1 Ballast may not be removed or relocated during any one regatta. The use of Velcro or similar quick release fasteners is prohibited as methods of mounting ballast.

Sunday, November 26, 2006

STAR 45 CLASS TECHNICAL COMMITTEE Nov. 2006- Dec. 2007

Phil Geren Sat, 25 Nov 2006 20:57:08 EST

STAR 45 CLASS

TECHNICAL COMMITTEE

November 2006 To December 2007


Table of Contents

Origin of this Committee. 3

Charter 3

Membership. 3

Processes. 4

Action Items, prioritized. 5


Origin of this Committee

Don Keeney, Class Secretary of the Star 45 Class of model yachts sanctioned by the American Model Yachting Association, announced at the National Championship Regatta held in October of 2006 that he plans to assist the Membership of the Class in achieving a clear, unambiguous, and uniform interpretation of the Rules. He also stated a goal to enhance the growth of participation in the Class.

To these ends Don formed the Star 45 Class Technical Committee of November 2006 through December 2007. The objectives, members, working processes, an an initial list of prioritized action items are set forth below.

Charter

The Technical Committee shall:

µ Ensure that the Star 45 Class Rules are:

o Capable of being clearly understood by all Class members without ambiguity;

o Subject to only one interpretation;

o Adequate to preserve the one-design principle of the Class, while allowing room for improvement in sailing performance

By:

o Formulating and publishing Guidelines for Rule Interpretation and Application (“GRI”);

o Submitting to the Class Secretary proposed Rule Amendments and New Rules;

µ Enhance growth in Class Membership by:

o Discovering and publishing corrections and clarifications to errors and ambiguities in the approved Star 45 reference and construction plans;

o Discovering and publishing Guidelines For Building And Tuning (“GBT”) Star 45 Model Yachts in order to assist a builder in achieving a competitive racing boat, at minimum cost, complying with the Rules, regardless whether building from scratch or from kit materials.

Membership

The Technical Committee shall comprise eight participants: the Class Secretary, Committee Chairman, and six Members. The Committee Chairman and the Members shall have voting rights.

The following people shall be directly involved in the business of the Technical Committee:

Class Secretary: shall participate in all discussions; shall take the final decision on all issues regarding the Rules after receiving the recommendation of the Committee. shall have no vote in Committee voting processes; shall, subject to his sole discretion, publish Guidelines for Rule Interpretation and Application received from the Technical Committee; shall, subject to his sole discretion, submit to the Class Membership for approval Rule Amendments and New Rules received from the Technical Committee;

Committee Chairman: shall recruit to fill vacancies on the Committee; shall chair discussions among Committee Members and administer voting processes; shall have voting rights; shall prepare the final wording of GRIs and GBTs based upon the consensus of the Committee; shall publish GBTs;

Committee Members: shall bring issues to the Committee for action; shall discuss and reach consensus, through simple majority vote on all issues; shall formulate Guidelines for Rule Interpretation and Application and submit these to the Committee Chairman for preparation of a final document; shall formulate, prepare, achieve consensus upon and submit to the Committee Chairman Guidelines For Building And Tuning Star 45 Model Yachts.

Present Committee Membership:

Class Secretary: Don Keeney, 1keyknee@281.com

Committee Chairman: Phil Geren, philgeren@aol.com

John Fisher, racer577@citystar.com

Dave Mainwaring, mainwaring@rcn.com

David Ramos, david@rcyachts.com

Peter Latournes, platournes@aol.com

Mel Holman, foxnlox@buckeye-express.com

Region 3 Candidate - being recruited

Processes

µ Discussion shall take place through postings of Email messages to:

star45technicalcommittee@mainzone.com

or messages posted while visiting this website:

http://mainzone.com/cgi/lyris.pl?enjter=star45technicalcommittee .

Posted messages are read at: http://mainzone.com/cgi/lyris.pl?enjter=star45technicalcommittee .

Please note that photos and attachments cannot be sent to the above.

Photos and attachments can be sent to: http://star-45.blogspot.com/ , where building information is being archived.

µ Consensus shall be by simple majority vote;

µ The quorum shall be the Committee Chairman plus 4 or 6 Members;

µ Guidelines for Rule Interpretation and Application shall be published by the Class Secretary as he sees fit;

µ Guidelines For Building And Tuning Star 45 Model Yachts shall be published at Star 45@yahoogroups.com , at star45houston.com , and at http://star-45.blogspot.com/ .

µ Preliminary performance targets for the Committee are to:

§ issue this Technical Committee organizational document for voting by the Committee on 26 November 2006;

§ issue one GRI per month;

§ issue the first GBT within three months.

Action Items, prioritized

1. Guidelines for Rule Interpretation and Application:

a. overhang of backstay chainplate, strut, boomkin or other device – how to measure

b. “hull” definition, wood, fiberglass

c. 1/4” or 3/8” bow bumper overhang

d. rudder profile and dimension limitations

e. jib numbering

f. obtain reference and constructing drawings additionally from Class Secretary (not just Ship’s Store)

g. fiberglass = fiber reinforced plastic, such as glass or other fiber cloth impregnated with hardened epoxy or polyester resin

h. Rule 1.4: rule to be waived if unable to be reasonably applied, such as, for example, if the deck or keel is attached, if verification by another Class member is inconvenient (requiring mailing the model, for example). Alternatively, Rule 1.4 to be deleted.

i. Hierarchy between Rules and Drawings

2. Guidelines For Building And Tuning Star 45 Model Yachts

a. Make available the best of the versions of the laser-cut frame files with instructions, online

b. Discuss if http://star-45.blogspot.com/ organization is the optimum for guiding beginners

c. Keel and bulb locations

d. Wings on rudders and bulbs

e. Glue recommendations

f. New building materials

g. New sources for woods, other materials

h. Jib tweakers

i. Jib twitchers

j. Drawings, correctd on CD

k. Camber recommendations for keels and rudders

l. Backstay tension calibrated for mast bend

m. Mast bend recommendations vs wind speed vs luff curve

n. Sheeting angles vs windspeed

o. Mast position vs wind speed

Wednesday, November 22, 2006

Curved mast -- tuning a mainsail
From: Philgeren@aol.com
Sender: Star45@yahoogroups.com
Date: Wed, 22 Nov 2006 06:58:53 EST
Subject: Re: [Star45] Curved mast -- advantage ??

Curving a mast so that it bends convex forward (concave aft) moves the luff edge of the sail forward and reduces the camber of the sail in the section where the mast is bent (if bent half way up the mast, the camber in the up/down center of the luff of the sail is reduced). In a blow, this reduces power, reduces leeway force, reduces weather helm, allows the boat to increase its speed.

Generally, the minimum position of mast bend is considered to be a curve equal to the luff curve designed into the luff edge of the mainsail. For very light air and for heavy air, maximum mast bend is used for maximum speed. For very light air, less camber makes it easier for air to stay attached to the leeward surface of the mainsail as the air passes aft. For medium air and for waves, where maximum power equates to maximum speed, minimum mast bend is used to get maximum designed camber.


By use of all the tuning controls on a mainsail, one can obtain a certain amount of control over the distribution of camber over the length of the mast, and there will be an optimum camber distribution for any particular sail and set of wind conditions. Pretty complicated to get it perfect, however outstanding sailors like Stuart Walker are on record as saying it is of paramount importance to use this against competitors who are using it. Otherwise, in a one-design competition they win.
My two cents.

Monday, November 20, 2006

A great place to learn about sail trim.

From: "Don Keeney" <1keyknee@281.com>
Date: Sun, 19 Nov 2006 15:39:26 -0600
Subject: [Star45] Sail Trim

A great place to learn about sail trim.
http://www.sailingusa.info/sail_trim.htm

Don Keeney
Star 45 Class Secretary

--

Outstanding recommendation. Wonderful site. full of photographs and all sorts of instructional materials. Pictures of tells and how to read them:)
--

Also a must place to visit and test your sailing skills:

National Geographics Interactive Sailing:

Master rudder and sail to get your boat going as fast as possible no matter what direction you're sailing in-or which way the wind's blowing.
Controls available:

Sail Adjuster: Use the left sliding controller to rotate the sail in relation to shifting wind (shown as arrows). When you cross the path of the wind, your sail will swing to the opposite side.

Rudder Adjuster: Using the right sliding controller, steer to port (left) or starboard (right).


Uncle Dave

Friday, November 17, 2006

Star 45 Construction ply sides and a cedar strip planked bottom

From: "John Fisher"

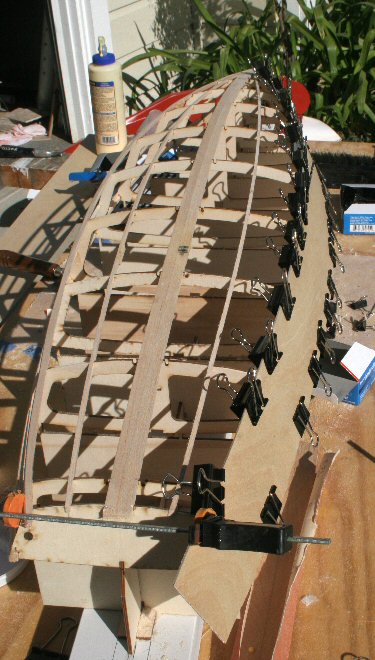
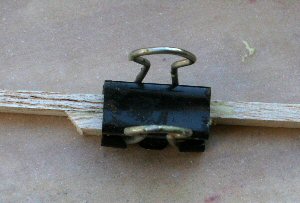
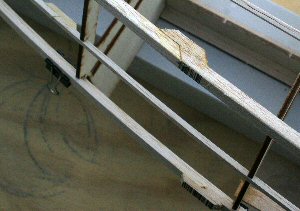
Here is my dad putting the sides on his boat. This method could be done with balsa as well if someone has an issue with CA. The clips he uses can be purchased at any office supply store.

His boat is going to have ply sides and a cedar strip planked bottom. I made him a set of frames with 1/16 cut on the sides and 1/8 cut on the bottom for this application.

Using 1/16 inch plywood for sides

I use Titebond glue instead of CA. I first clamp a 4" by 48"
piece of the plywood against the framework on the building board. I then trace around the profile of the side to outline the approximate size and shape of the plank. Using a knife, I cut around the outline to remove excess plywood leaving about a half inch extra. This should be sufficient to allow the clamps to grab the stringers along the rail and the chine. I then apply Titebond on the stringers and clamp the plywood
in place starting in the middle and working to the ends. I used about 40 clamps to ensure a tight seal (2679).

I trim the plywood back to about a 1/16 of an inch above the balsa stringer using a Stanley modeling plane (2681). These cost about $10 at Ace Hardware or any home warehouse. This takes about 5 minutes and then I use sandpaper to finish the trimming.

Star 45 Construction splicing wood to get longer pieces


John Fisher writes:
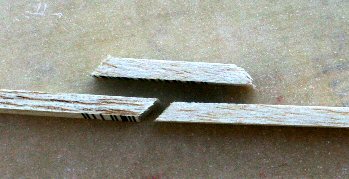
Since 48 inch balsa is hard to find, I used 1½ pieces of 36 inch balsa that I joined using a 45 degree scarf. I cut a small (about 1 inch long) piece of the balsa I'm joining as a support for the joint, both structural and for alignment. 2668 shows the three pieces before gluing. I use titebond rather than CA because I'm sensitive to CA. I clamp the three pieces as shown in 2669 using the table top and the small piece to gain alignment in both directions for the two long piece. During construction the small piece of balsa must be placed where it doesn't interfere with the construction (2673). Once the stringer is glued to another piece of planking or another stringer the small piece can be removed using an Exacto knife and sandpaper

Monday, November 13, 2006

S45 Construction radio tray as a built in component to the hull.


From: racer577@citystar.com

I am building a new boat and incorperating a few new ideas. One is to
include the radio tray as a built in component to the hull. I added two
1/16 plywood plates that are notched to fit into the frames. This
particular one is designed to hold one servo and a RMG winch. I will see
how this works out. The down side is going to be limited access, but the
up side is light weight and strength.

If there is interest I may build this up for other winch options.

John

S45 Construction Rigging photos from John Fisher


Subject: Star 45 deck rigging

Here are some rigging photo's. Back stay fitting,
jib lead that I used, note that it holds the line off center so
it doesn't get caught in the mast jack, Another shows the notch I
put in the mast so I could put the sail on and the crane that I used,
and another shows my mast jack and vang. Plus a photo of my deck layout on
812.

John

S45 Construction rudders on #812 and #813


From John Fisher:
Here are the two rudder examples, 812 is the thicker one and 813 is thinner. The % thickness is the same on both, but 812 is thicker over more of the rudder since it was a 1/8" pc of balsa that was rounded on the ends. 813 was made by two pcs of 1/64 ply expanded over a 1/8" shaft.

They clearly show the difference in cross section, however they’re a little small to judge the details. Interested in contrasting the radius of the leading edge. Is there much of a difference between the two rudders in the first .125 to .25 of the foil? Typically sections with a sharp leading edge will lead to a pronounced stall as the flow can’t make the sharp turn to stay attached to the low pressure side.

Tuesday, October 03, 2006

Monday, September 25, 2006

Star 45 Model Boat:
2004 Julie Ayres Award Winner - Mel Holman of Toledo, Ohio


Star 45 Class: "Featured in Model Yachting #113


2004 Julie Ayres Award Winner - Mel Holman of Toledo, Ohio

The Julie Ayres Craftsmanship and Beauty Trophy is awarded to the Star 45 owner voted by the participants at the yearly National Championship Regatta for what they feel is the most beautiful boat and shows the most Craftsmanship in the building of a competitive Star 45.

The Julie Ayres Craftsmanship and Beauty Trophy is awarded to the Star 45 owner voted by the participants at the yearly National Championship Regatta for what they feel is the most beautiful boat and shows the most Craftsmanship in the building of a competitive Star 45."

Star 45 Construction : Stand for tuning finished model

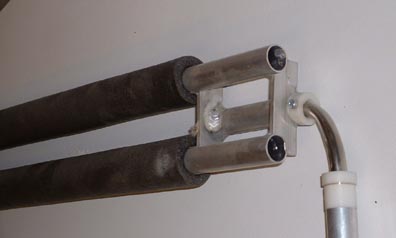
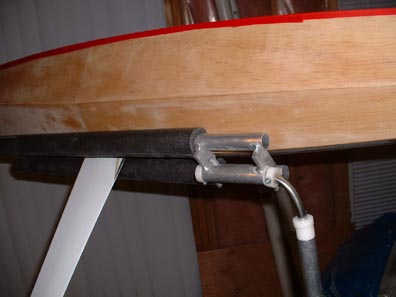
John Fisher sent these in. It might spark some thought for other people as well. He does not claim to have come up with this design, You can use any materials that you have handy, He has a mill and a welder, so his ended up in aluminum. these stands have been built from PVC and Copper pipe as well.

The stand has a vertical tube that is the pivot for direction. This way the boat can feather into the wind. If the ground is soft enough where you sail it can be pushed into the ground. Works fine in so-cal but not very well in colorado. Next there is a H shaped part that holds the boat. His are machined and welded aluminum, but he has seen this part done with copper water pipe or PVC pipe. He added the foam for insulating water pipes to prevent the boat from being scratched. The H should be able to rotate. This allows the boat to heel in the stand when force is applied to the sails. Connect the two and you have your stand. On his stand the connector is a pcs of 1/2" diameter SS tubing bent 90 deg. It provides both motions needed.

tunstand051sml

The boat shown is a hard chine 10R Class called the Diamond.

tunestand71sml.jpg
John Fisher has cutting files available for hard chine model 10R Class as well.
They go fast :-). John's 10R Class carries 1500 sq in of sail, is 65"
long and only 9" wide.

Star 45 Construction | modeler: John Whiteford, Rochedale, Queensland, Australia

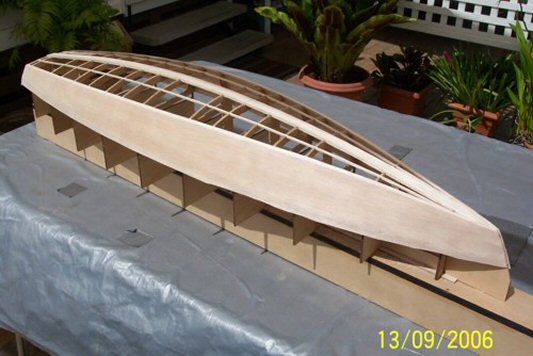
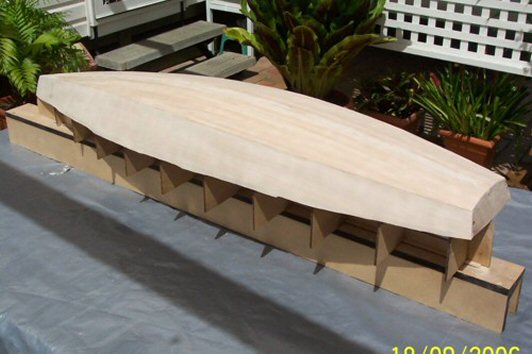
Thought you may like to see a boat being built in Rochedale, Queensland, Australia. John Fisher kindly sent me the dxf files and I had them laser cut and everything is going together well with the hull now fibreglassed. I have all of his photos and comments in separate plastic folders and now quite a collection. He is certainly a delightful person and a great help.
John Whiteford

Photographs by John Whiteford

Stringers3sml.jpg
Panel5sml.jpg
Planked4sml.jpg